Simple mechanisms combined
In this chapter, you will learn how simple mechanisms can be combined to make complex machines that are useful. You will learn about a mechanism called a pulley, which is often part of a crane. Then you will learn how a crank handle can be used to make a winder. A crank and winder mechanism allows a rope to wind up easily.

Figure 1: Cranes use pulleys and levers.

Figure 2
Machines combine simple mechanisms
Do you remember what a mechanism is? Mechanisms are the parts that make up a machine . Machines are usually made of many simple mechanisms connected together.
Why are mechanisms useful? They help us to move things further, faster or more easily. We can put together simple mechanisms to design a machine that will give us mechanical advantage.
Remember:
- Mechanical advantage reduces the input or effort force so that loads are easier to move.
- First-class levers have the fulcrum positioned between the effort and the load.
- Second-class levers have the fulcrum positioned at one end of the lever and the effort at the other end. The load is always between the effort and the fulcrum.
- Third-class levers have the fulcrum and the load positioned on opposite ends of the lever. The effort is in the middle.
Figure 3 on the opposite page shows a "tower crane". These cranes are used to help us build high buildings.
Tower cranes are tall, straight cranes that use ropes, pulleys and winches to help people to lift very heavy things, such as bricks and cement. They are made of simple mechanisms all working together.
Use the picture of the tower crane on the opposite page to answer the questions.
1. What do you think the main purpose of the crane is?
2. What do the pulleys do?
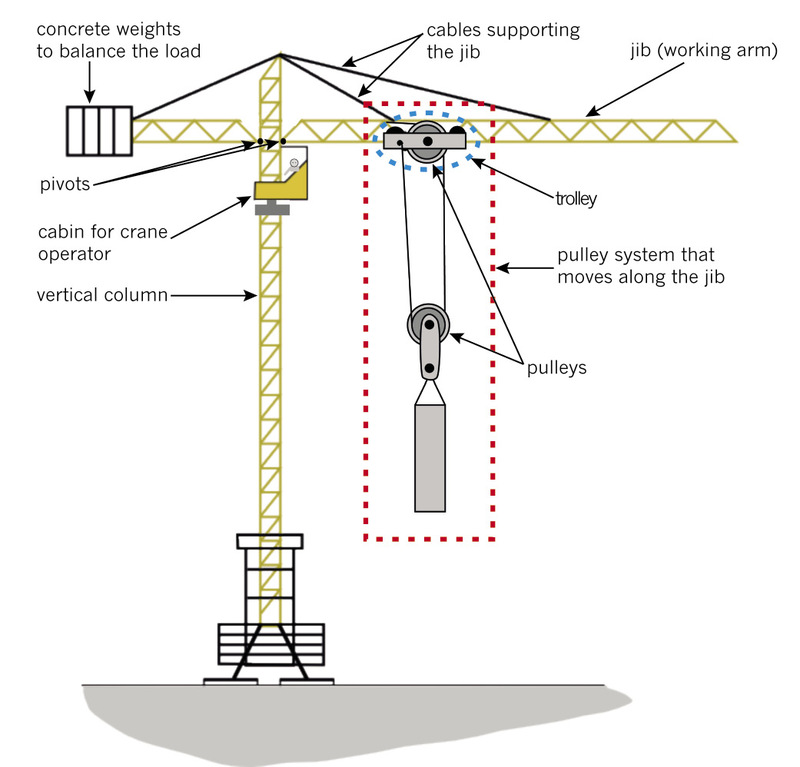
Figure 3: A tower crane uses many different mechanisms.
3. The crane needs to lift heavy things from different places on the ground. How does the trolley help people to lift things from different places on the ground?
4. Why does the crane need to rotate?
Rotate means to turn around an axis or centre point.
5. The jib has a fulcrum on top of the vertical column. It has an input force or effort from the diagonal cables right at the top of the crane pulling the jib up, and a load pulling the jib down. How do you know that the jib is actually a lever?
6. Is the jib a first-class, second-class or third-class lever? How do you know?
7. What stops the crane from falling over when it lifts something?
8. Make a list of all of the mechanisms on this crane that help it to lift loads.
9. Now make a list of all the parts that hold the crane up, and keep it balanced, so that it can lift things safely.
Pulleys - mechanical advantage from ropes and cables
Look at Figure 4. A man is lifting a heavy bag. He is using a rope wrapped around a pulley so that he can pull down to lift the bag, instead of lifting the bag up. The pulley makes it possible for the rope to change the direction in which the rope pulls. When he pulls down on the rope, he can lean with his weight on the rope to make it easier to pull the bag up. But there is no mechanical advantage in this situation.
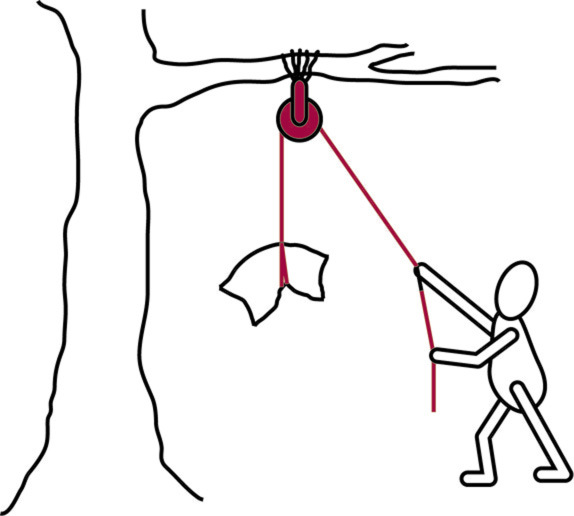
Figure 4: A man is using a rope and a pulley wheel to lift a heavy bag.
Look at Figure 5. A person uses two pulleys to lift a weight. One pulley wheel is connected to the roof. The second pulley wheel hangs on a loop of rope. The two pulleys and the way the rope is wrapped around both pulleys, forms a pulley system . The pulley system makes it easier to lift a load. Here is how it works:
- At the effort end, you pull on one piece of rope.
- Two pieces of rope lift the load.
- Two pulleys connected to a single piece of rope, as shown in Figure 5, give a mechanical advantage.
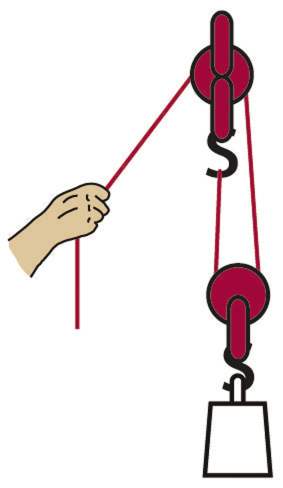
Figure 5: If you connect two pulleys to a piece of rope like this, you get a mechanical advantage.
Make your own pulley system
You need the following things for this activity:
- two plastic curtain sliders to act as pulleys,
- 500 mm of string or cotton,
- a few weights, like steel nuts or washers,
- a flat piece of corrugated cardboard, about A4 sized,
- paper clips, and
- three pins.
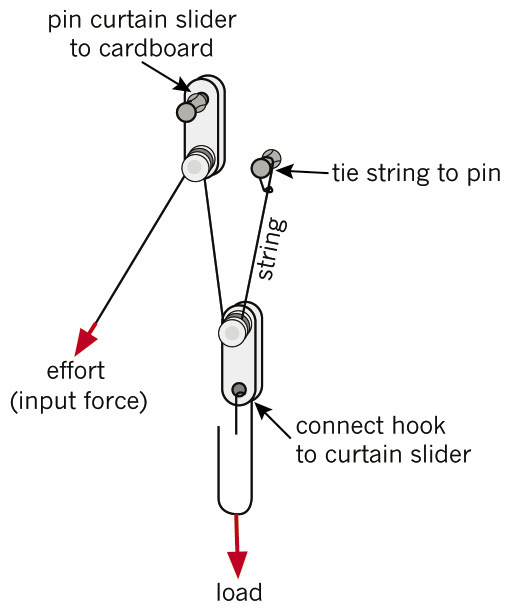
Figure 6: You can make a pulley system out of curtain sliders.
Study the picture in Figure 6 to help you make your own pulley system. The instructions are below .
Making your own pulley system
- Use a pin to attach a curtain slider about 30 cm from the top of the corrugated card. This will be the fixed pulley.
- Make a hook from the third paper clip and attach it to the bottom hole of the other curtain slider. This will be the moving pulley.
- Use a pin to fix one end of the string to the cardboard somewhere close to the fixed pulley
- Thread the string around the moving pulley, and then back up and over the fixed pulley.
- Attach your load to the hook at the bottom.
- Hang the pulley board onto a wall, or lean it against a wall .
1. Pull the string downwards. What happens to the load?
2. How many parts of the string pull up the load on the output or load side of the system?
3. How man y parts of string are pulled down on the input or effort side of the system ?
4. Pull the end of the string at the input or effort side down by exactly 100 mm. Then measure how far the load lifts up. Write your answer below.
5. Try to lift the load without the pulley system. How does it compare to lifting the load with the pulley system? Does the pulley system make it easier?
An even easier pulley system
Do this activity for homework to add to your understanding of pulley systems. Add two more curtain sliders to your pulley system. Look at the picture below to help you. Test the system by lifting the same load as before.
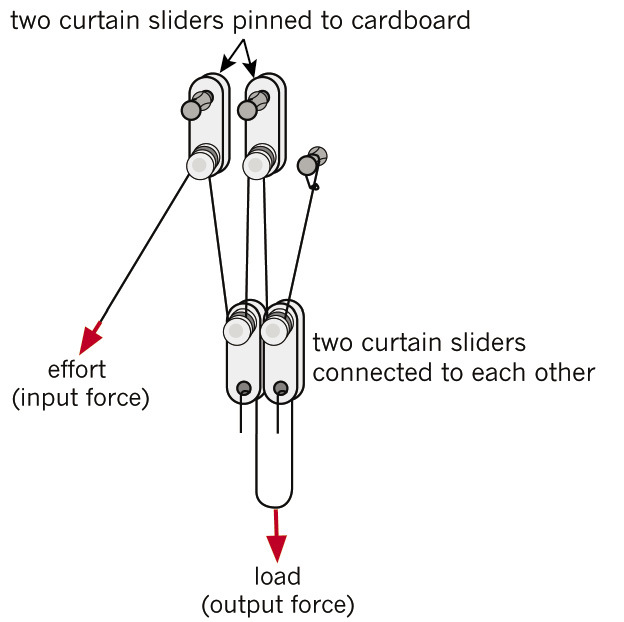
Figure 7: You will increase the mechanical advantage if you use more pulleys. There will be more lengths of string to lift the load.
1. What distance does the load lift when you pull the string down by 100 cm?
2. Describe what a pulley mechanism does.
3. What do you think pulley systems are mostly used for?
4. Real pulley systems use wheels instead of curtain sliders. Why do you think this is? Hint: Think how you can make it easy to slide an object over a rough surface .
Combining mechanisms
Make a lifting system
In this activity, you will combine mechanisms to make a machine that can lift things. Remember that machines make it easier for us to move, lift, push or pull things .
Look at the model of the lifting system shown in Figure 8. You will have a chance to make this lifting system in the activities that follow. But first answer the questions below.
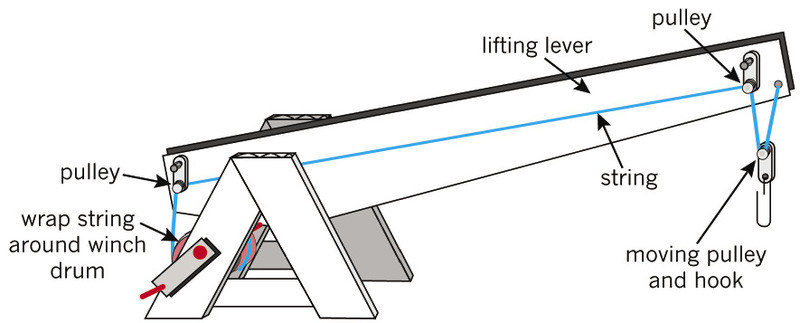
Figure 8: A lifting system that you can make
1. How does the pulley system help to lift things?
2. What does the lever do in this system?
3. Explain how you could use this system to lift a load?
Make an a-frame for a fulcrum
Trace the shapes in Figure 9 below. Then cut out the shapes and paste them onto a piece of corrugated cardboard. Cut out the cardboard shapes.
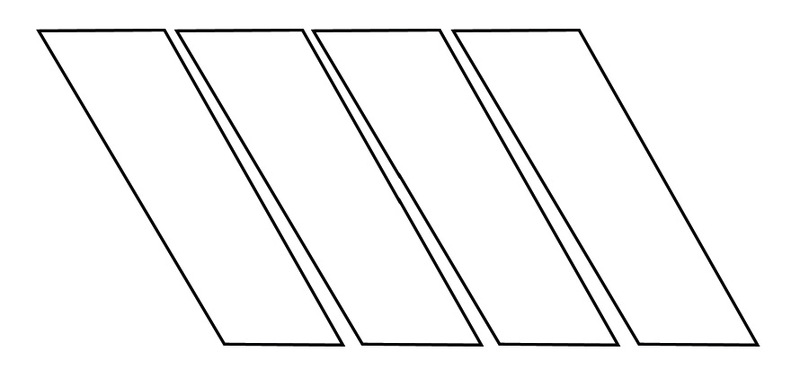
Figure 9: Use these four shapes to make an A-frame.
- Use these shapes to make two A-frames.
- Glue two shapes together at the top.
- Add parcel tape to the bottom to make the A shape.
Look at Figure 10 to see how to do this.
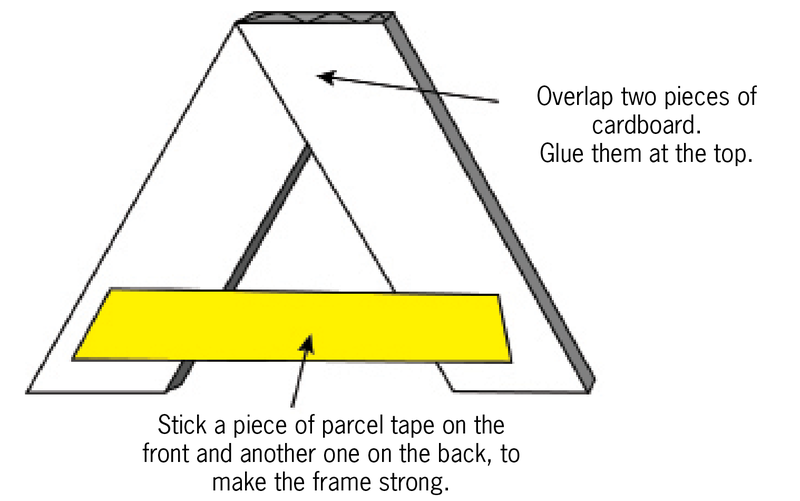
Figure 10: How to make an A-frame
Make a hand-driven winch
A winch is a mechanism that is the combination of:
- a winch drum that is a cylinder around which rope or cable is rolled up,
- an axle that allows the drum to rotate, and
- a crank that is a lever or " arm " with which the drum is turned.
You need the following things for this activity:
- two milk-bottle tops,
- sticky tape,
- a long nail,
- stiff cardboard 15 mm wide and 40 mm long, and
- a small nail.
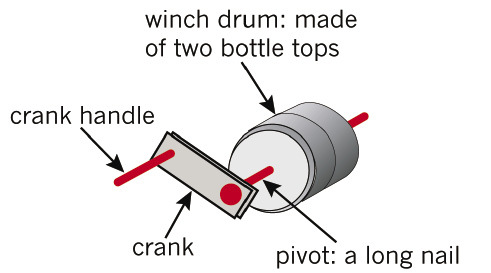
Figure 11: You can make a hand-driven winch drum by joining two milk-bottle tops together.
- Tape the two milk-bottle tops together.
- Make two small holes in the centres of the bottle tops. The axle of your winch will go through these holes.
- Cut a piece of stiff cardboard for your crank. It should be about 15 mm wide and 40 mm long.
-
Push the long nail through one side of the
crank. Then push the nail through the centre of
the drum, and out through the other side of the
drum.
An axle is the straight bar around which something like a wheel or a winch drum rotates. In other words: it is the fulcrum around which something turns.
Note: The crank lever and the drum must fit tightly onto the nail. When the crank turns, the drum should also turn.
- Make a crank handle by pushing a smaller nail through the other side of the crank lever.
Attach the winch to the A frame
- Make a hole through each of the two A frames, in the one " leg " of the A frame, about 45 mm from the base.

Figure 12: Put your crank and winder into your A frame.
- Carefully take the winch apart and set the drum aside. Then push the axle with the crank attached to it through the hole on the A frame at the front.
- Put the drum between the A frames at the front and the back, and then push the axle through the drum again.
- Keep pushing the axle until it goes through the hole in the A-frame at the back.
1. What does the hand-driven winch do?
Make a lifting lever
Now trace this shape and use it to make a corrugated cardboard lifting lever, exactly the same size as the one below in Figure 13.
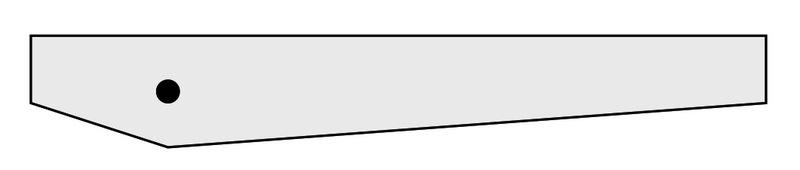
Figure 13: You can use this shape to make a lifting lever.
Follow these steps:
- Make a hole in both A frames, about 10 mm down from the top.
- Make a hole on the lifting lever, 10 mm up from the bottom of the V-shape.
- Use a nail as the fulcrum and join the lifting lever to the two A frames to make a second-class lever.
- Push another nail through the right legs of the A frames to hold the lever up. Look at Figure 14 to help you.
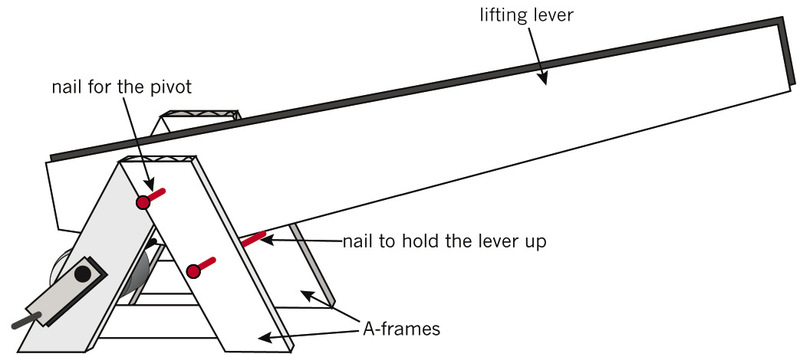
Figure 14: How to connect your lifting lever to your A frames
Add a pulley system
Follow this method:
- Pin two curtain sliders onto your lifting lever , one on the right and another one on the left. These sliders will guide your lifting rope.
- Add a pin, or make a hole on the right-hand side of the lifting lever. Tie a piece of cotton thread or thin string to the pin, or make a knot through the hole.
- Make a hook from a paper clip and hook it onto another curtain slider.
- Thread the string around the pulley with the hook on, over the pulley on the right side of the lifting lever, and then over the pulley of left side of the lifting lever.
- Pull the loose end of the string down to the winch, and wrap it around the drum a few times. Then stick it onto the drum.
- Turn the crank until the hook hangs in the air.
Look at Figure 15 to help you, and answer the questions.

Figure 15: Add a pulley system to your lifting lever.
Questions
1. How do you use this system to lift things?
2. What shape do you think makes the A frames on this system strong?
3. As it is at the moment, the lifting lever of your model crane does not move. Could you change or add something so that you can make the lifting lever move up and down? Explain how you could do this. Hint: You can have two winches on a crane.
4. Name the mechanisms that have been combined to make this system.
5. Does the winch give you a mechanical advantage? Explain your answer.
Remember : A mechanical advantage makes the output force (on the load) bigger than the input force (effort).
A distance advantage makes the load move further than the effort moves.
6. Does the pulley system give you a distance advantage? Explain your answer.
What have you learnt?
1. Which mechanisms can you combine to make a crane? Explain your answer.
2. Give an example of a machine that uses a crank.
3. Give an example of a machine that uses pulleys.
4. How does a pulley system give a mechanical advantage?
Next week
Next week, you will start your mini-PAT for Term 3. You will design and make a machine to help a scrap-metal dealer sort the magnetic from the non-magnetic metals in the scrap yard.


