Mini-pat design a house to use less energy
When electricity is generated, it has a negative impact on the environment. To burn wood or gas or paraffin, also has a negative impact. During the next three weeks, you will think of ways to reduce this negative impact by designing a house in a clever way.
Week 1
The hidden cost of electricity
In the last few years, the cost of electricity has increased a lot. Some people are unhappy about this, because they don't have enough money to pay for electricity.
Electricity also has another cost that has nothing to do with money. This is the "cost" of electricity to the environment. Just like the amount of money that people have changes when they pay for electricity, so the environment changes when electricity is generated.
To make electricity is usually called to generate electricity.
This week, you will learn how the environment is changed by electricity generation. This change is often bad for the environment. You can say that electricity generation has a negative impact on the environment.
You will think about ways that this negative impact can be reduced.
Where does electricity come from? (30 minutes)
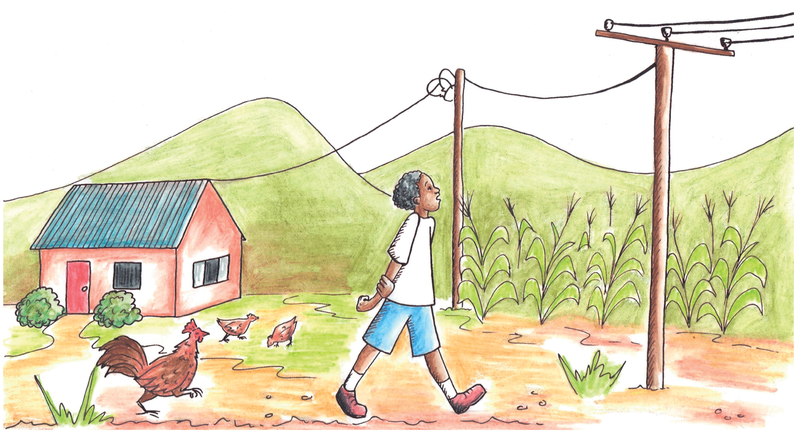
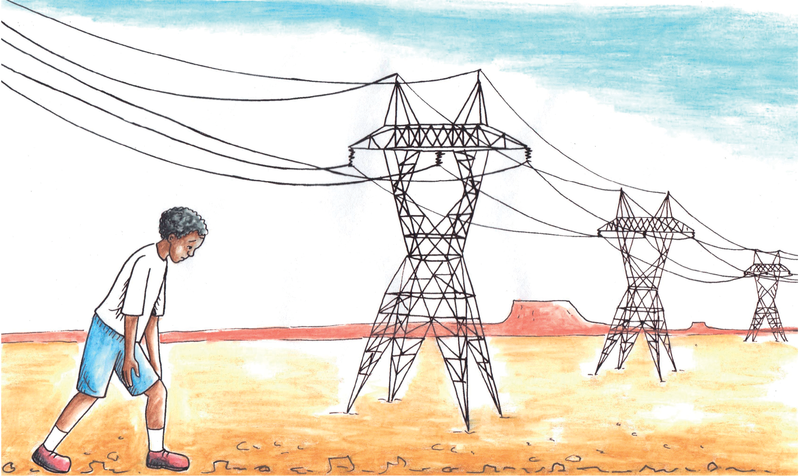
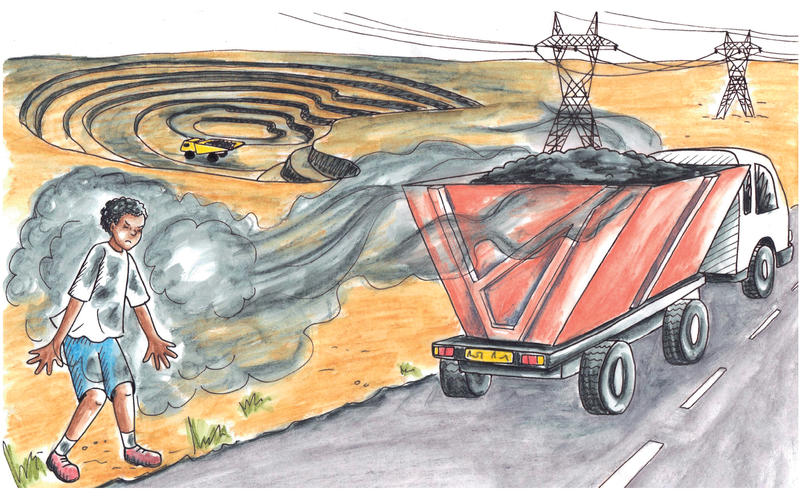
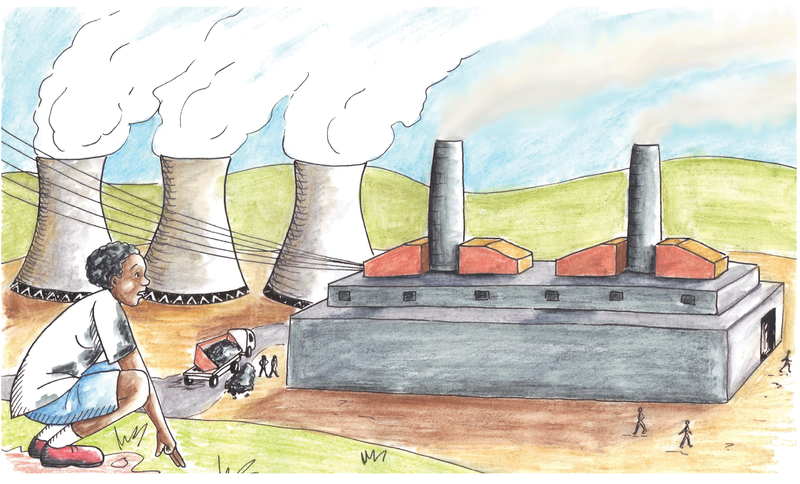
The boy followed the electricity lines to see where electricity comes from. When he went inside the power plant, a technician told him how a coal-fired power plant works. This is what she told him:
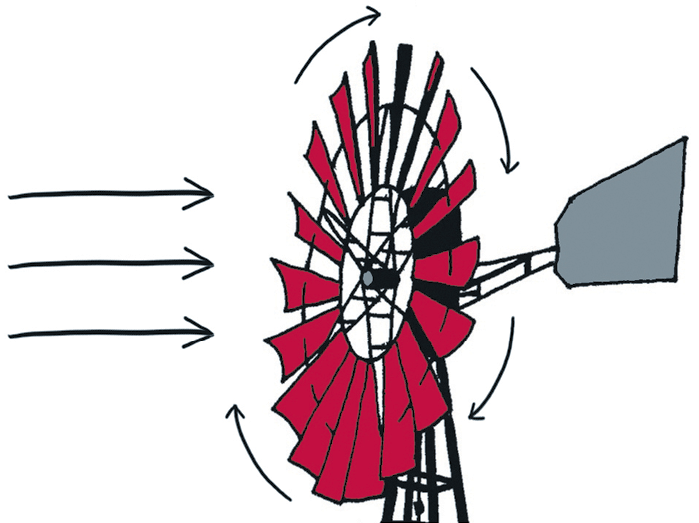
"In a power station, coal is burnt underneath a tank full of water that is called a boiler. The heat from the fire makes the water boil and evaporate to form steam with a high pressure. The high pressure steam blows through a turbine and makes it turn. This is very much like the wind making a wind pump turn. A device called a generator converts the rotational movement of the turbine into electricity.
The gases and smoke from the fire passes through a filter before it goes through the chimney into the air. The filter removes most of the ash and soot particles, so that there is only a little bit of smoke that comes out the top of the chimney."
When a balloon bursts, or when there is a puncture in a bicycle or a motorcar tyre, the air inside bursts out very quickly and strongly. This is because the air inside a balloon and a tyre is under high pressure.
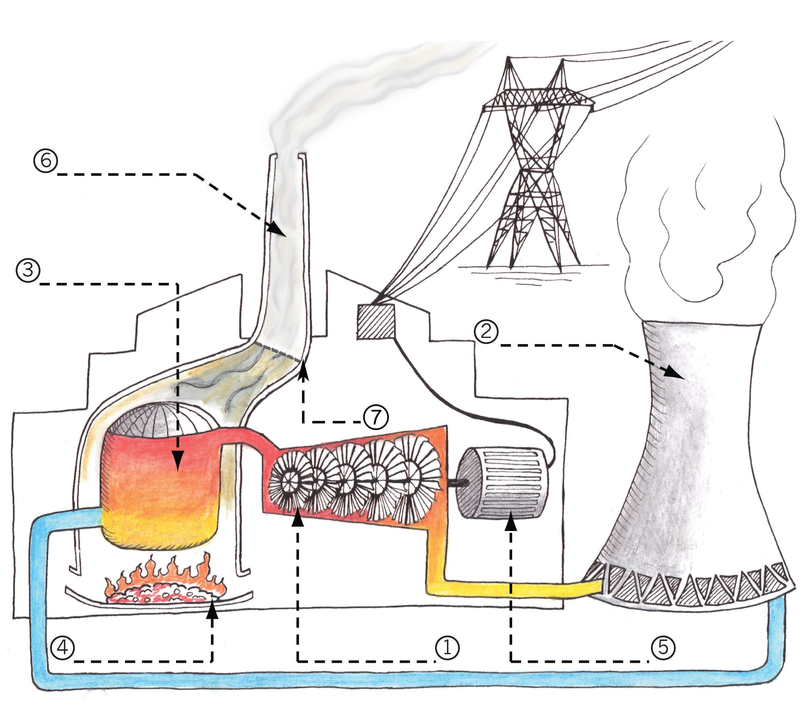
A coal-fired power plant has the following parts:
- A generator.
- A cooling tower. This tower uses air to cool the steam that comes out of the turbine. This makes the steam condense into water, which is then reused. Only a little bit of steam is released from the top of the tower.
- A furnace where the coal is burnt.
- A filter to remove ash and soot particles, so that they are not released into the air.
- A chimney releasing carbon dioxide into the atmosphere.
- A turbine.
- A boiler tank where water is changed into high-pressure steam.
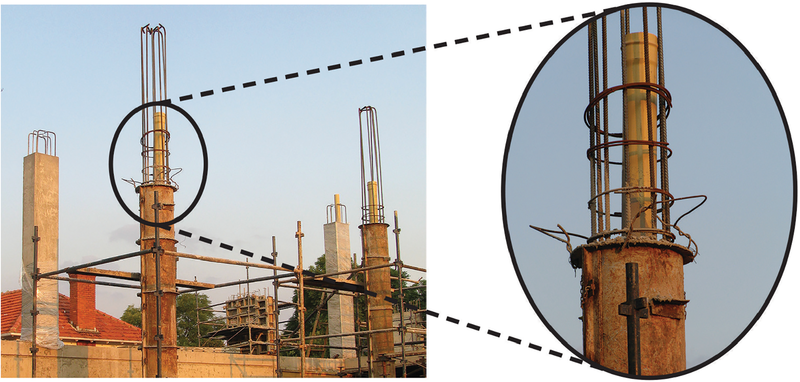
Investigate: the different parts of a power station
Which part of a power station is shown by which number on the picture in Figure 7? Use your pencil to write the names of the parts on the dashed lines next to the numbers on the picture.[3½]
How does electricity generation impact on the environment?(30 minutes)
Look at the picture below.
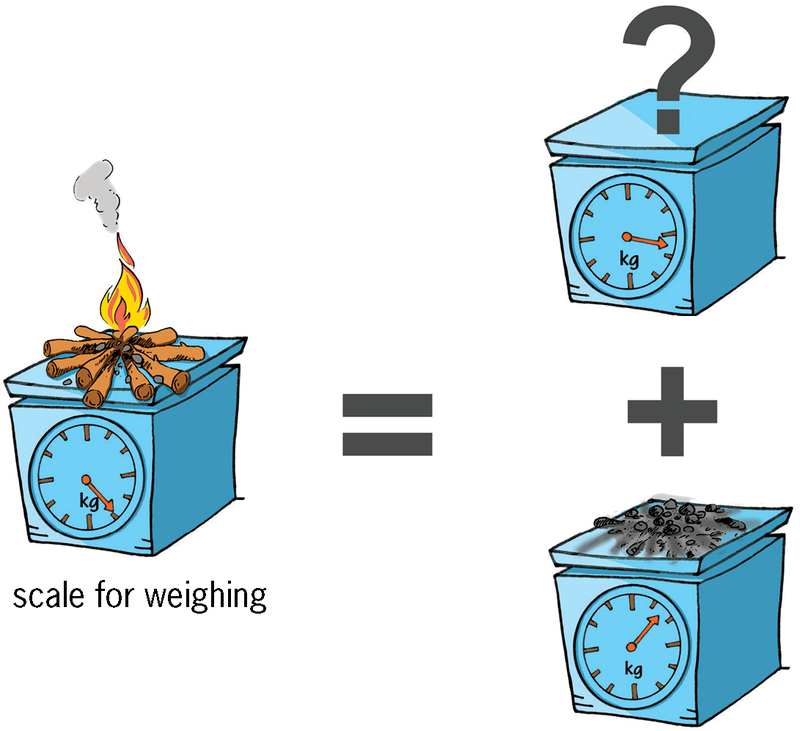
The ash left at the end weighs much less than the wood from which the fire was made at the start. What happened to the rest of the weight?
There are many different materials or substances that you can burn to create heat and light. Wood, coal, paraffin, gas and oil are some of the substances that you know about. They are called fuels. All of these fuels contain carbon.
Carbon is one of the main building blocks from which plants and animals are made. These building blocks are very small. It is impossible to see them. Carbon is a solid.
Carbon stores energy, like a battery. When carbon is on its own, you can say the battery is charged. When the carbon is bonded with another small building block called oxygen, then the battery is flat. Oxygen is a gas. When carbon is bonded to oxygen, they are together called carbon dioxide. Carbon dioxide is a gas.
When two very small building blocks of a material are close together, they stick together, as if they were glued with very strong glue. This is called chemical bonding. You will learn more about this later when you do chemistry in natural science.
Go outside on a very cold but sunny winter's day. Let the sunlight shine on your hand. Why does your hand start to feel warm, even though the air around it is very cold? It is because the sunlight is changed into heat, inside your skin. Light and heat are two different forms of energy. Movement and electricity are two other forms of energy.
When carbon bonds with oxygen, energy is released in the form of heat: carbon + oxygen = carbon dioxide + energy.
This is what happens when an animal eats food that contains carbon and breathes air that contains oxygen. The carbon and oxygen combine inside the animal to give it energy and to make it grow. The same thing happens when plant material containing carbon burns in air.
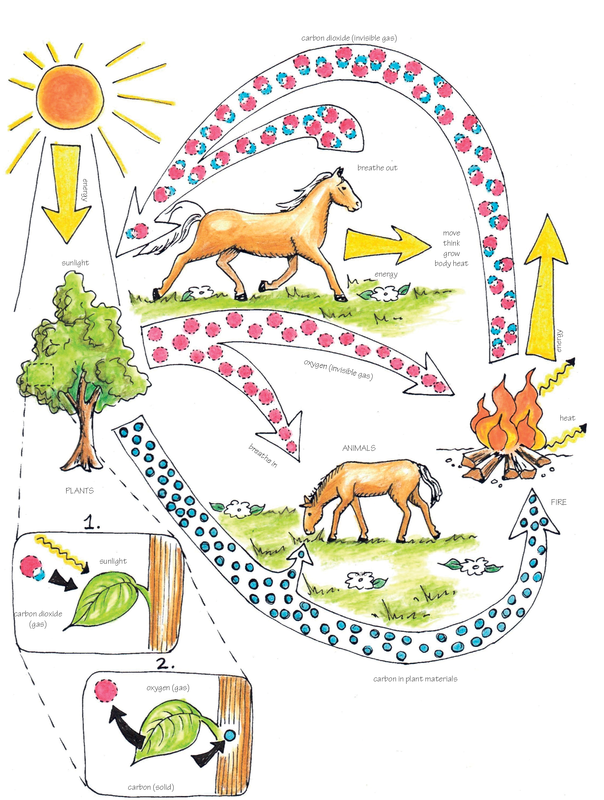
To separate carbon and oxygen that is bonded, energy is needed. Plants separate carbon and oxygen by using the energy of sunlight: carbon dioxide + light = carbon + oxygen.
Plants use the carbon to grow, because carbon is the main building block of plants. They release the oxygen back into the air.
The change of carbon into carbon dioxide and thenback into carbon is called the carbon cycle. This is shown in the picture on the next page.
When you make a fire or burn gas or paraffin in your house, carbon dioxide is released into the air. When you use an electrical stove, no carbon dioxide is released from your house. But carbon dioxide is released from a power plant that makes the electricity you use.
Investigate: carbon dioxide
-
What changes carbon dioxide gas back into carbon in a solid form?(1)
-
What does this solid carbon become part of?(1)
-
-
Can you see carbon dioxide rising from a fire?(½)
-
People use fuel for light and heat. What else do they use fuel for?(1)
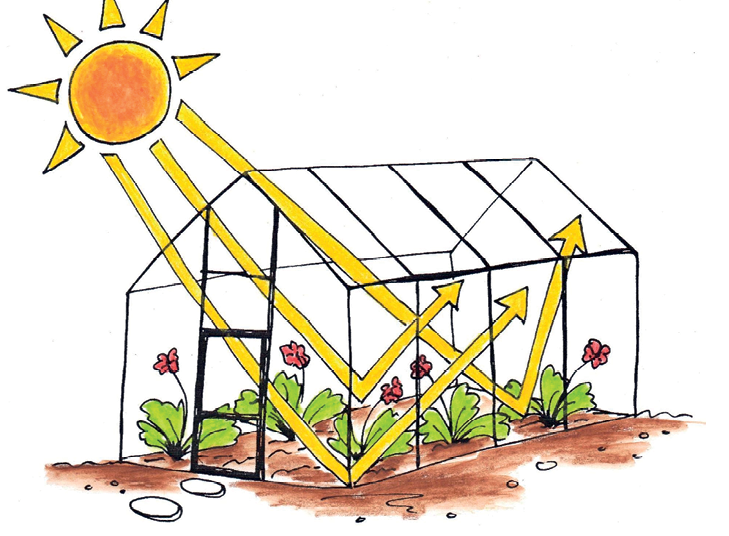
On the right is a picture of a greenhouse. Greenhouses keep plants warm in winter, by using the energy of sunlight. It lets the energy of sunlight come inside, but does not let the same amount of energy go outside again. Therefore, it is warmer inside a greenhouse than outside. Greenhouses can be made from glass or plastic.
The layer of air around the earth is called the atmosphere. It is a little bit like the glass or plastic covering of a greenhouse. It lets the energy of sunlight in, but does not let the same amount of energy escape again. This is called the greenhouse effect. If this did not happen, it would be freezing cold every night!
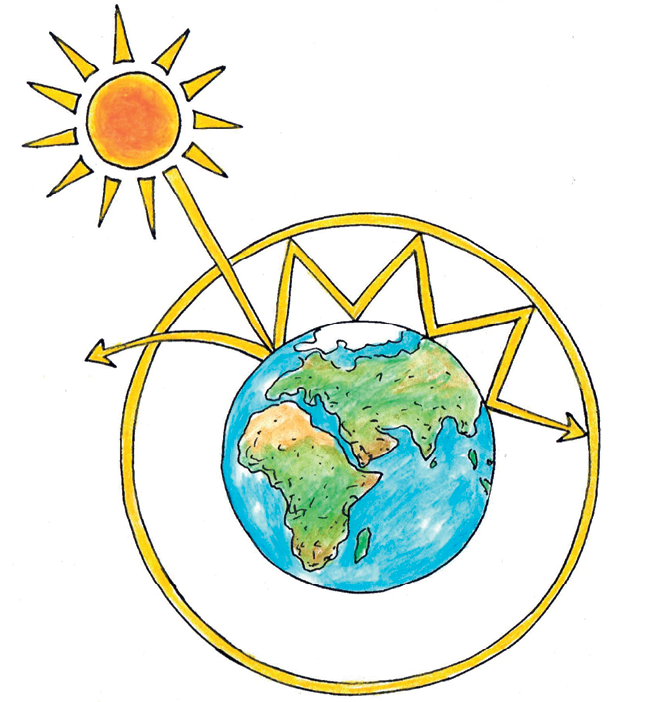
When something is burnt, carbon dioxide is released into the air. Carbon dioxide is a gas that is very good at trapping the energy of sunlight. But only a small part of air is made of carbon dioxide. The more carbon dioxide is in the atmosphere, the more energy of sunlight is trapped, which means it will become warmer on earth. Many people are worried that the climate is changing, which can lead to droughts and storms.
-
What would happen if the amount of carbon dioxide in the atmosphereincreases? (1)
Total [4.5]
How can the negative impact of electricity generation be reduced? (60 minutes)
Later this year, you will learn about different kinds of power stations. Some of them release less or no carbon dioxide into the atmosphere. There is hope that in future, less electricity will be generated by coal-fired power stations. But most electricity is still generated by coal-fired power stations, and this is not going to change soon.
You will now discuss what the users of electricity can do to reduce the amount of carbon dioxide released into the atmosphere. Every time you switch on a kettle or another electrical appliance, you use electricity. The more electricity people use, the more electricity the power stations have to generate.
There is also a hidden way of using electricity. Every time you buy something that was made in a factory, the factory used electricity to make the product. If people bought less of those products, then the factories would be smaller and use less electricity.
Investigate: what can you do to release less carbon dioxide?
In this lesson, your teacher will lead the whole class in a discussion about how ordinary people can use less electricity, or burn less wood, gas or paraffin. The following questions will give you some ideas for your discussion:
-
When you make tea or coffee, how much water do you put into the kettle to boil? Do you put in more water than you need? Does the amount of water that you boil have an effect on how much electricity you consume? (1)
-
When you leave a room, do you switch off the lights? Will that reduce the amount of electricity you use? (1)
-
Many houses have an electrical geyser to heat water. A geyser is a water tank that supplies hot water to taps. An electric element in a geyser heats the water, just like an electric element inside a kettle heats water.
Sarah takes a warm shower for five minutes every day. Nyiko takes a warm shower for 20 minutes every day. Does the time you take to shower have an effect on how much electricity you use?(1)
-
Look at the following cut-away picture of a geyser. Can something be changed or added to a geyser so that it will use less electricity?(1)
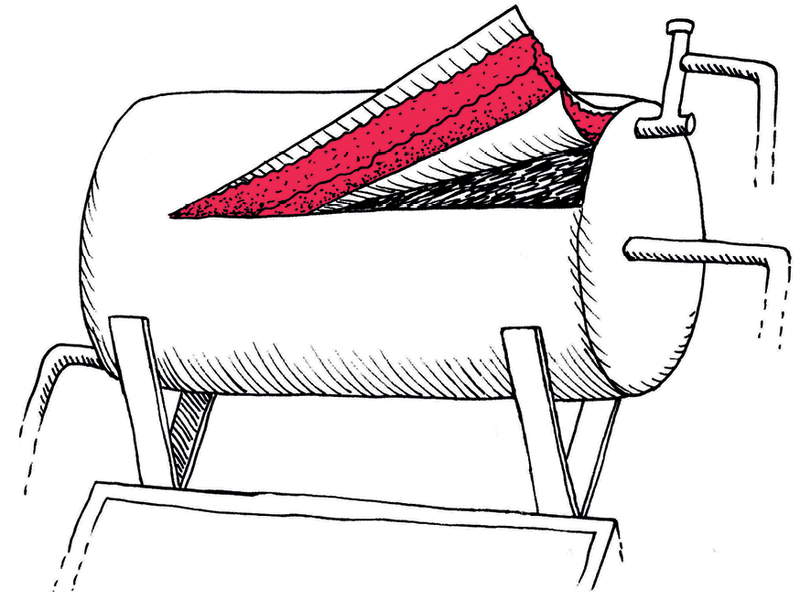
Figure 12

-
Thabo's family uses an electric heater to heat their house in winter. On the right is a photo of their roof from inside the house. Somebody told them that a lot of heat can escape through a roof. This means that a lot of the heat from the heater is wasted because it leaves through the roof. Can they change something to their house so that less heat will escape through the roof? (1)

Figure 14 -
Nabeelah's family live in a house without electricity. They use gas, candlesand wood for heat and light. Katlego's family lives in a house with electricity. They only use electric lights and appliances. The two families are the same size. They both use about the same amount of light, hot water, and heat for cooking. Which family causes more carbon dioxide to be released into the atmosphere? (1)
Total [6]
Something you could do at home
Below is one idea for using less electricity or fuel when cooking:
Bring the food to boiling point in a pot on the stove. Then take the pot off the stove and wrap it in a thick jacket to keep it very hot. Leave it there for two to three hours. The idea is the same as a person dressing very warmly on a cold day. To wrap a jacket around a pot to keep it warm is called insulating the pot.
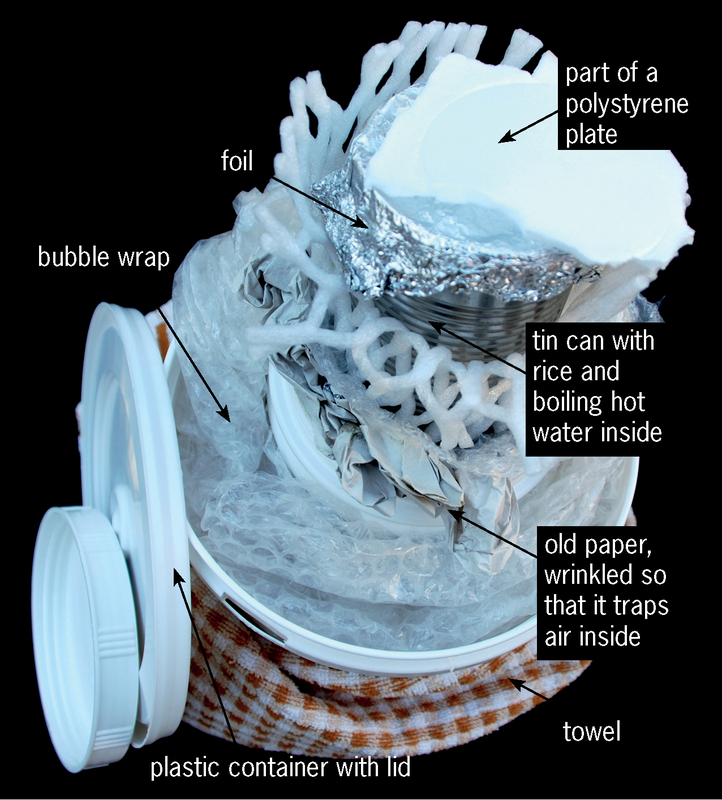
The photo below shows an insulated cooking box that was used to cook rice. This box was made from waste materials. Before the towel was wrapped around it, the box felt slightly warm after the pot was put into it. That meant that heat was escaping from the pot. So an extra layer of insulation was added by wrapping a towel around the box. The towel was carefully wrapped around the box, so that it covered every part of the box. If some part of the box was not covered by the towel, heat could have escaped from that part of the box. It took two hours to cook the rice.
Safety warnings
Boiling hot water can burn you!
If the food in the box is warm but not hot, and it stays in the box for more than an hour, bacteria can grow. That can cause food poisoning. To prevent this, make sure that the box is well insulated, and do not leave food in the box for more than three hours.
Week 2
Save energy by using less building materials
Factories use electricity or burn coal to make many building materials like cement and steel. You can say that there is an energy cost and a carbon dioxide cost to building materials.
Did you know?
About 9 kg of carbon dioxide is released into the air to manufacture 10 kg of cement or 10 kg of steel.
How can the amount of carbon dioxide that isreleased into the atmosphere be reduced? One way isto design things cleverly so that less material is needed to build them. Then the factories will make less material. Another way is to cut down fewer trees, because trees help to reduce the amount of carbon dioxide in the air.
This week, you will learn about three materials made in special shapes, or combined in special ways, so that a small amount of material can make a strong object. You will learn about reinforced concrete, plywood, and steel I-beams. But first, you will do revision about the different types of forces that can act on materials.
Forces acting on materials (30 minutes)
Revision questions
Look back on what you learnt in Chapter 1 to answer the following questions. If you find a question difficult, it can help you to first make a rough sketch of the situation. Your brain often works better if you can see the thing that you have to think about.
-
What forces can act on a tree trunk?
-
What type of force acts on a column or pillar under a bridge?
-
What type of force acts on the chain of a bicycle?
-
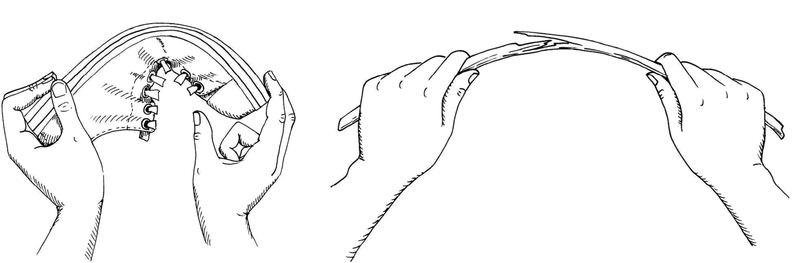
Take your workbook and bend it as in the photo below. Make sure that the left and right sides of the book stay at right angles to the front and back of the book.
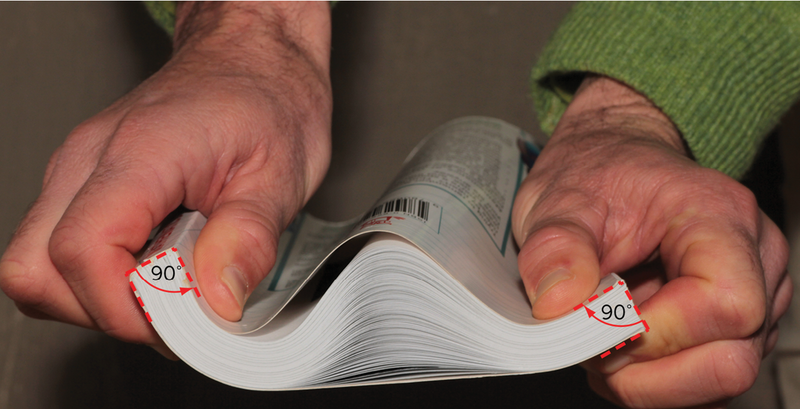
Figure 16 -
Why does the book make a "bubble" at the top when you bend it?
-
What does it feel like at the bottom of the book? Are the bottom pages loose or tight?
-
-
Bolts and nuts are used to hold different pieces of material together, as shown in the picture on the right.
What different types of forces can act on a bolt? Explain your answer or answers.
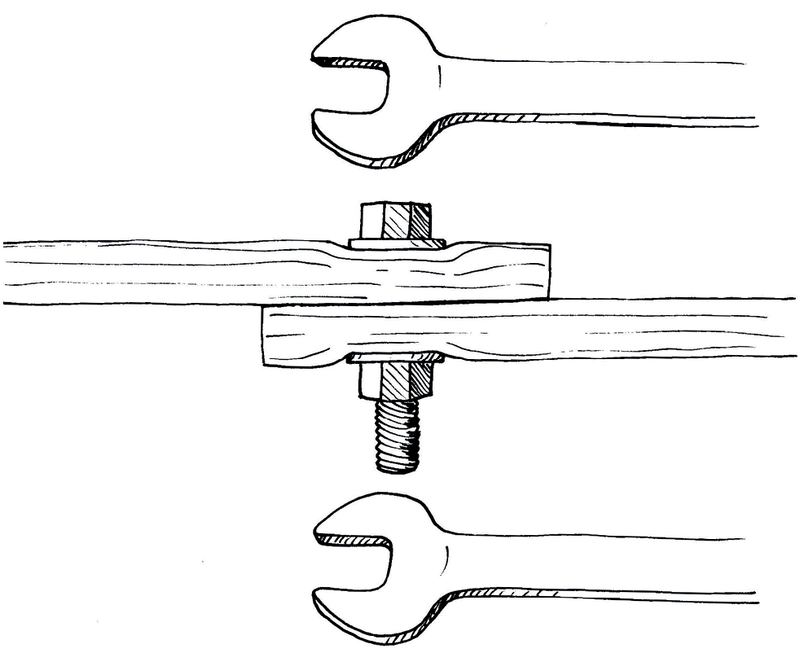
Figure 17
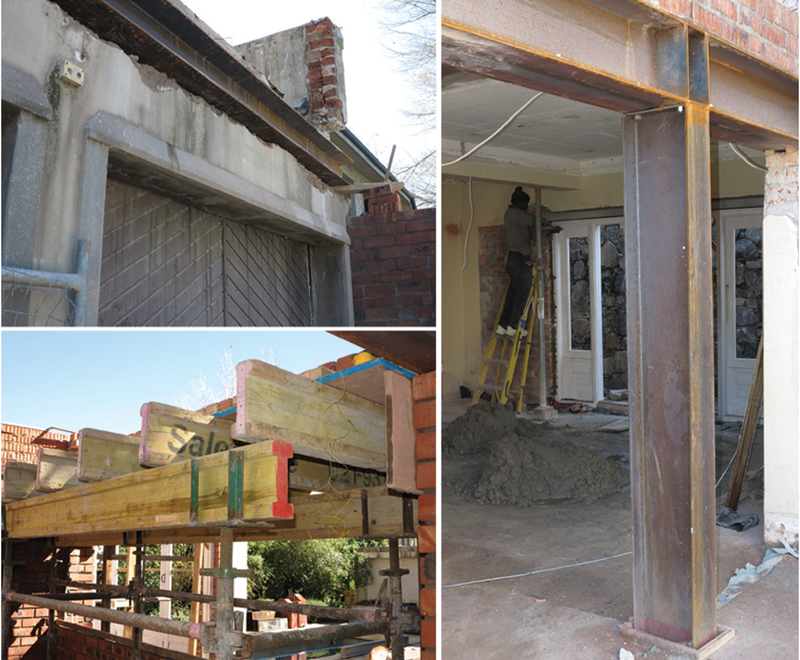
Reinforced concrete and plywood (30 minutes)
Reinforced concrete
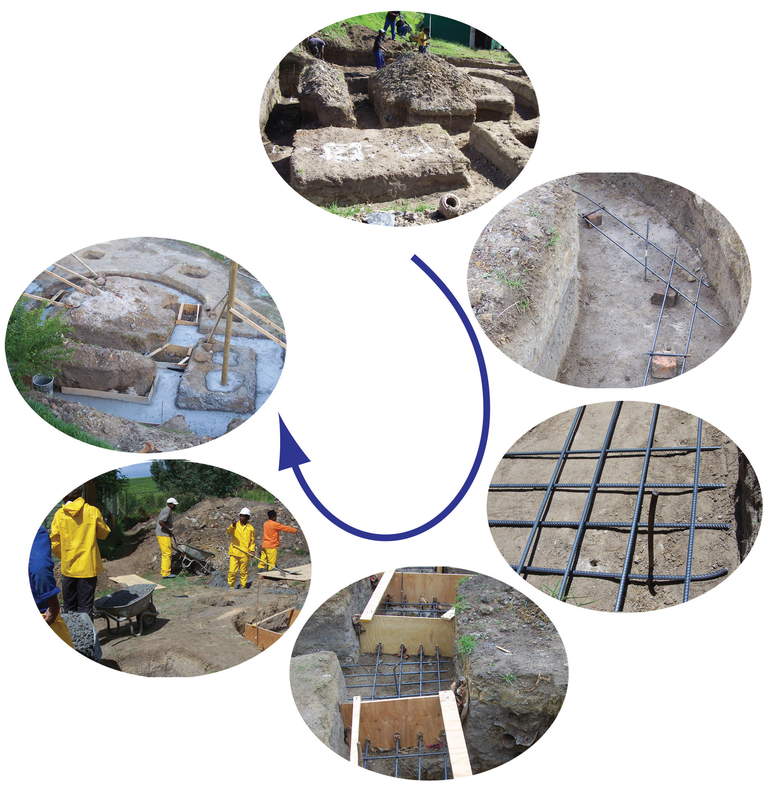
Concrete is used in most modern structures and buildings. It can withstand very large compressive forces without breaking. But it cannot withstand large tensile forces. In most situations, concrete structural members like pillars and beams experience both compressive and tensile forces. To make concrete withstand large tensile forces too, steel rods or mesh is placed in the concrete when the wet concrete is poured into a shape or mould. Steel can withstand very large tensile forces. Concrete that has steel inside of it is called reinforced concrete.

Plywood
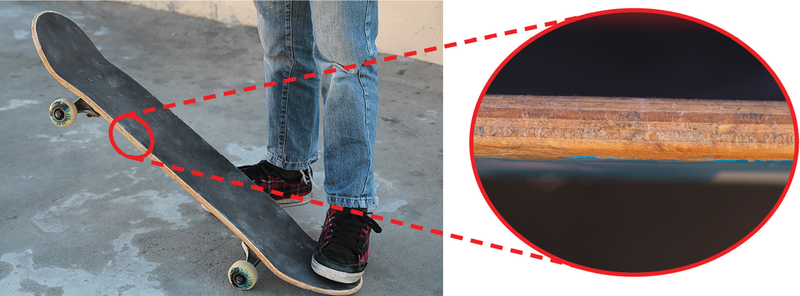
Wood is made of fibres that are arranged lengthwise in a tree trunk or branch. This arrangement is called the grain of the wood, and it can be seen as thin parallel lines.
Wood often cracks in the direction of its grain. This happens when a tensile force is applied across the direction of the grain.
Another way to say "across" the direction of the grain, is to say at a right angle with the direction of the grain.
Plywood is a made by glueing many thin layers of wood on top of one another. The grain in each layer is at a right angle to the grains in the layers above and below it. Plywood can therefore withstand large tensile forces in both directions.
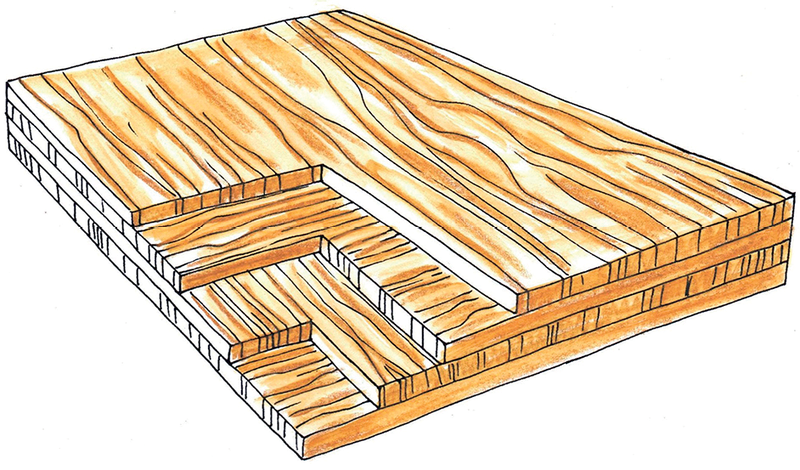
Plywood is mostly used for shell structures that cover large surface areas, like floors. Other examples of the use of plywood are for seats and back rests of chairs, for table tops, and for skateboards.
A plywood shell structure is often supported by a frame structure underneath it.
Investigate: properties of different materials
-
If a material is pulled in the directions of its length and its width using the same tensile force, will it stretch by the same amount in both directions?
-
The material of which a jersey is made:
-
The material of which a school shirt is made:
-
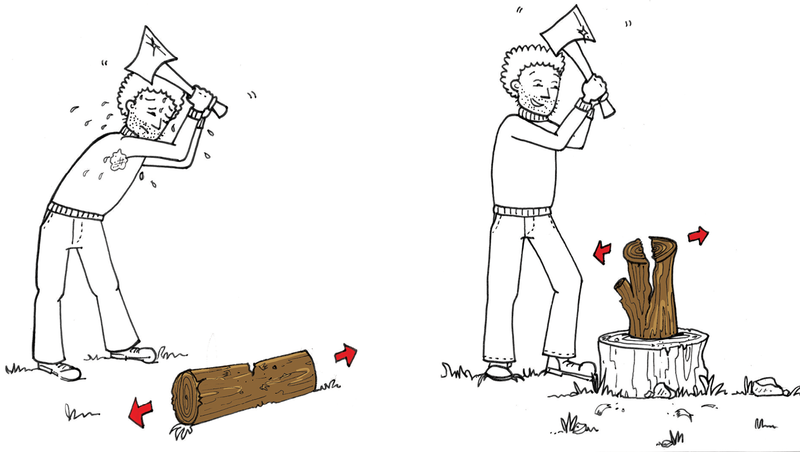
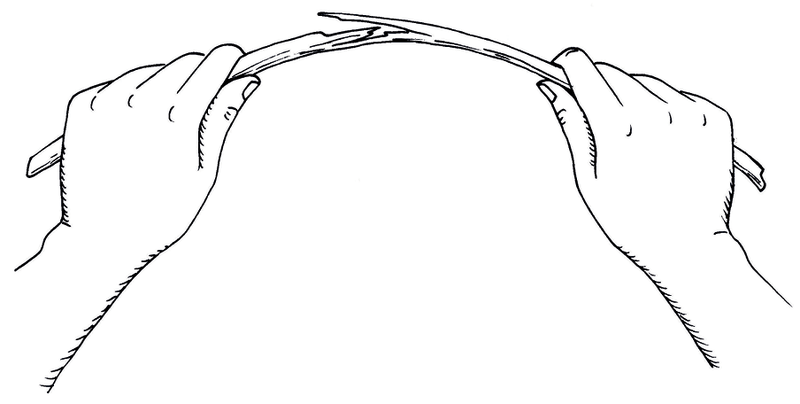
Look at the pictures below. A dry piece of wood cracks easily when you bend it, but the rubber sole of a shoe does not crack, even if you bend it a lot.
Rubber can change shape when it is pulled apart or pushed together. When you stop pushing or pulling it, it returns to its original shape. People say that rubber is an elastic material. Elastic bands are also made from rubber. When a tensile force is applied to an elastic rubber band, it gets longer. It also gets thinner.
Dry wood is only a little bit elastic, so it cannot get much longer when you apply a tensile force to it. Therefore, when the tensile force is too big, the wood will crack. You can also say the wood will fracture. Note that the wood cracks at the top or outside of the bend, and not on the inside.
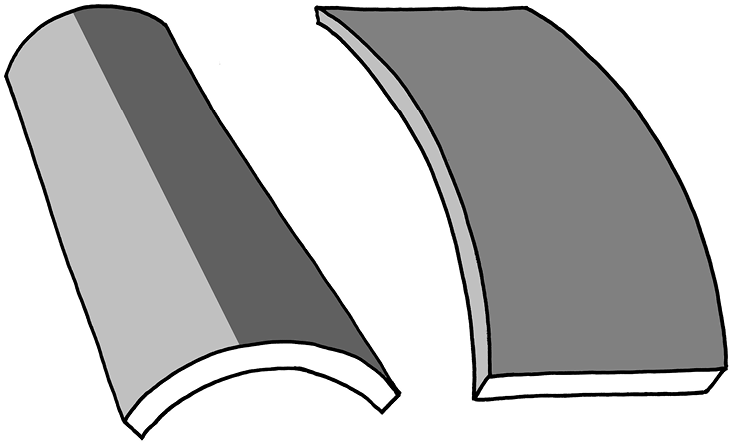
Steel i-beams (60 minutes)
Metal beams can be shaped in special ways to make them resist bending. The shape called an I-beam is a shape that resists bending very well.
The pictures below compare the resistance to bending of an I-beam, to the resistance to bending of a rectangular-shaped beam. Both beams have the same length between the two supports. And the load is the same on both beams.
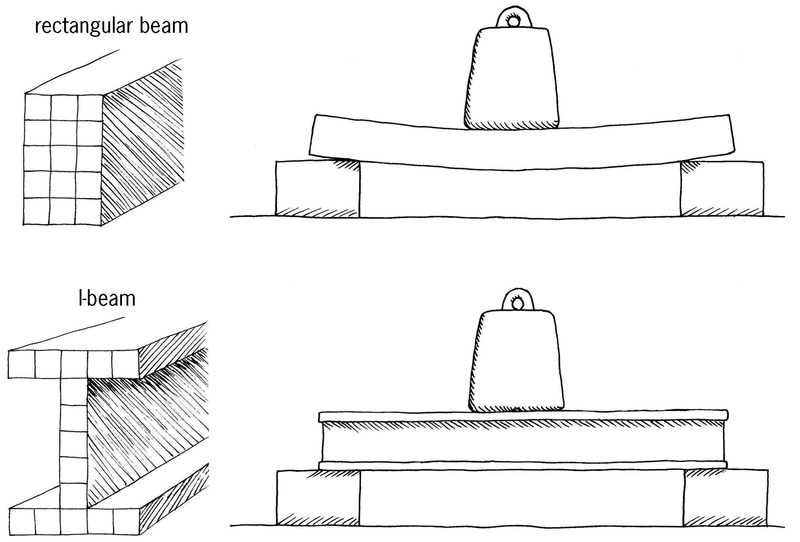
Count the blocks inside the pictures of the shapes of both beams. You will see that both beams are made from the same amount of material. That means that the weight of both beams are the same, and the cost of the material will be the same. Which beam bends the most under the weight of the load?
Because an I-beam resists bending better, a lighter and cheaper I-beam can be used to carry the same load as a rectangular beam. That also means that less steel will have to be made, so less energy will be used to make steel. In this way, clever design of material helps to reduce the negative impact of technology on the environment.
In the rest of the lesson, you will investigate why an I-beam resists bending better than a rectangular beam of the same weight. First, you have to understand what forces act at different places in a beam when it is bending.
Investigate: what forces act inside a beam that bends?
In the picture on the right, the dry piece of wood fractures at the top of the bend. That means there is a tensile force acting along the top of the wood. But the wood is only bent, so how can there be a tensile force acting on it?
The pictures below will help you to understand what happens to a beam that bends. The pictures do not show what the material of which the beam is made of actually looks like. Instead, the pictures show an imagined idea that wood is made of a lot of little blocks that are connected by springs.
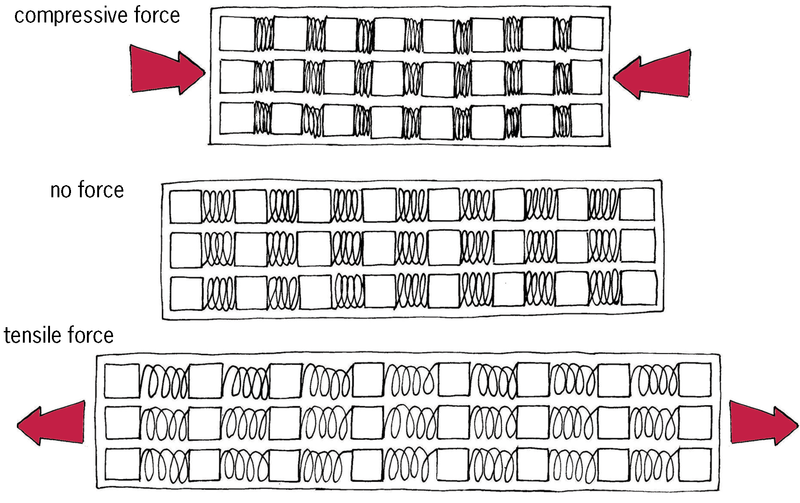
-
What happens to the imaginary springs when a tensile force acts along the length of the beam?
-
What happens to the imaginary springs when a compressive force acts along the length of the beam?
Below are pictures of a thin and a thick beam. Each beam bends when a load is applied in the middle of it. The pictures are drawn as if the beams are made up of many small blocks connected by springs.
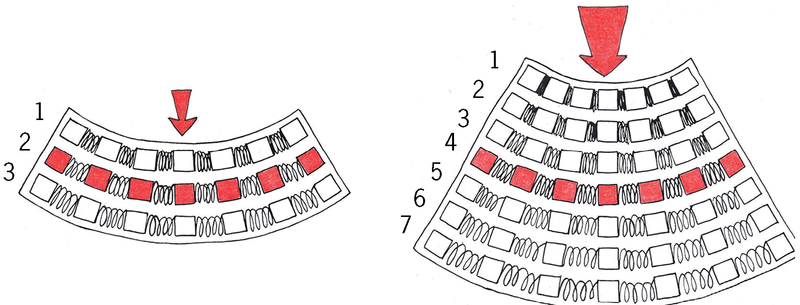
When a beam bends down, the following happens:
- The top gets shorter. It is compressed.
- The bottom gets longer. It is stretched.
- The middle stays the same length.
-
What type of force acts along the top of the beam when it bends down?
-
What type of force acts along the bottom of the beam when it bends down?
-
Is there a tensile or compressive force acting along the middle of the beam when it bends down?(1)
How does a spring work?
- The shorter you want to make a spring, the harder you have to press it.
- The longer you want to make a spring, the harder you have to pull it.
-
Look at the thick beam on Figure 29. There are seven rows or layers of blocks connected with springs. The layers are numbered.
-
Which two layers of the beam help it the most to resist bending?(1)
-
Does the middle layer of a beam help it to resist bending?(1)
-
-
Look at beam A and beam B below. They are both made of the same amount of material. You can count the blocks to check this.
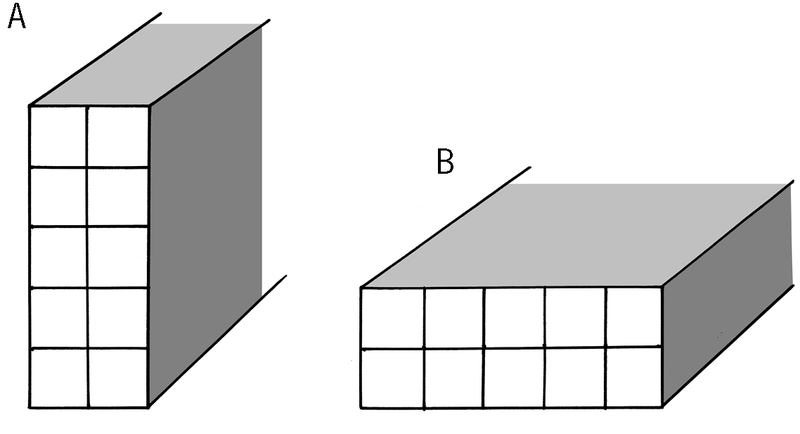
Figure 30 Which beam will bend the least if the same load is applied to both beams?
-
Compare beam C on the right to beams A and B. Will beam C resist bending better than beam B?
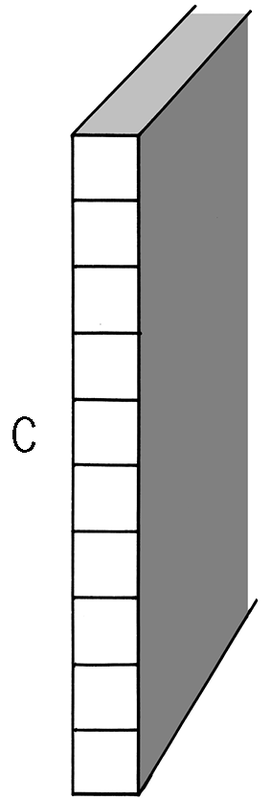
Figure 31
Beam C will resist bending the best when the force is acting exactly downdwards. But if there is only a very small sideways force, beam C will buckle because it is so thin.
Engineers wanted to design a new shape for a beam that will resist bending more than beam B, but without buckling like beam C. They knew that the material in the middle of a beam does help a lot to resist bending, because it does not stretch or compress a lot in the middle of a beam when it bends. Figure 33 explains this.
So they took the design of beam B, and removed some material from the middle and rather added it to the top and bottom, where there will be more stretching and compression. In this way, they made the beam taller, but they also added short horizontal parts at the top and the bottom to prevent the beam from buckling sideways. This is shown in the pictures below.

-
Why does an I-beam resist bending better than a rectangular beam made from the same amount of material?
Your answers to the previous questions will help you.
Total [6]
Week 3
Build a model of a house
A lot of electricity or fuel is used to heat a building when it's cold, or to cool it when it's hot.
This week, you will build a cardboard model of a house from the plans you will be given. Then you will design and make changes to the house so that it will need less heating in summer, and less cooling in winter.
Some of the changes you will make will be inside the house, and others will be outside. You will build a model of only one half of a house, as if the house has been cut open along the length of the roof. This will make it easy to work inside the small cardboard house to make changes to it. It will also make it easy for other people to see the changes you have made.

Build a model of a house: individual work (60 minutes)
The photo below shows the developments for different parts of the cardboard model that you will build. The walls and the floor are made out of one piece of cardboard. The roof and the inside wall of the house are made of two other pieces of cardboard. There are also thin strips of cardboard that will close the places where the windows are cut out and the door is cut open.
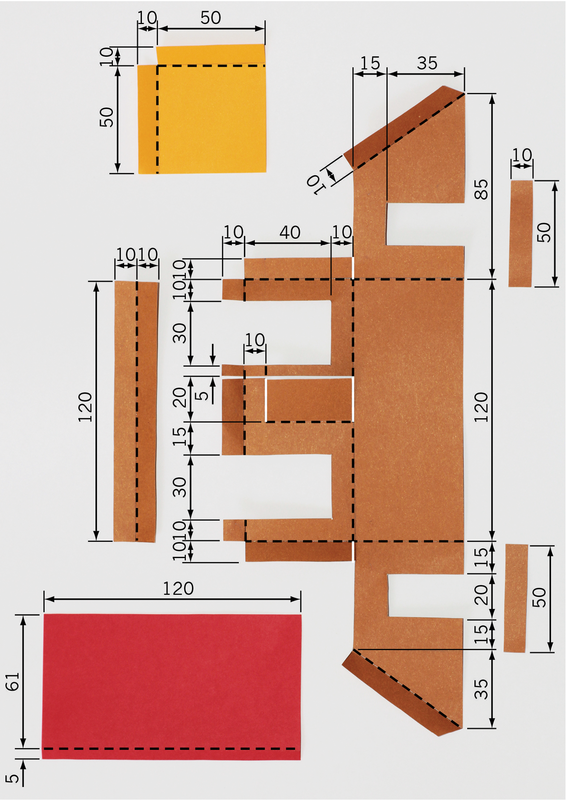
You will make your model out of thin cardboard. To save time, do not make roof trusses for your model.
You could use some old cereal boxes for cardboard. You will later cut out, fold and glue together your model. But first do the following things:
-
Make accurate drawings of the developments of the different parts your model. Make these drawings on cardboard.
-
Cut out and fold the developments of the different parts of your model.
-
Glue the small strips of cardboard to the walls, to close the spaces where the windows were cut out and the door was cut open.
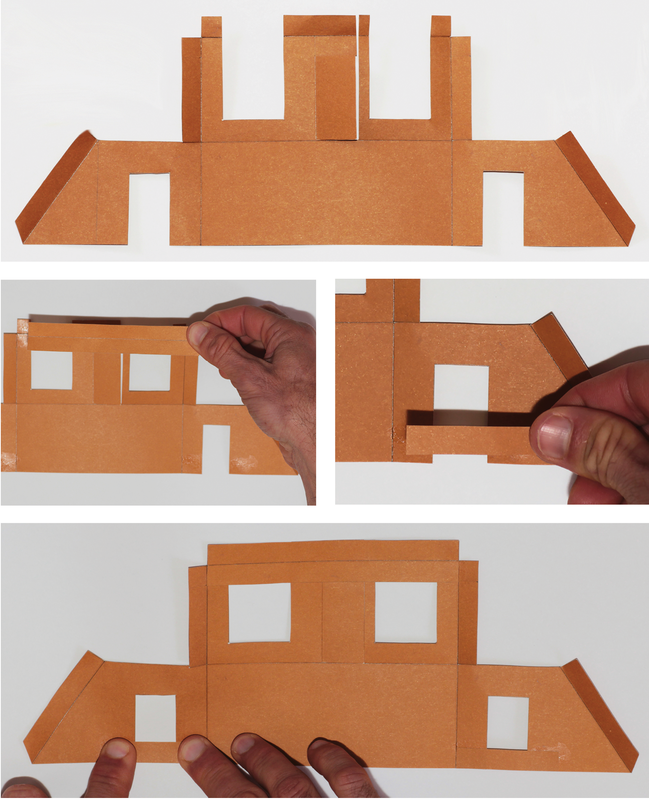
Figure 36 -
Fold the walls, and use Prestik to join them together. Then add the roof and the inside wall, also using Prestik. Have another look at Figure 36 if you are not sure how to do this.
Do not use glue from now on. Rather use Prestik, because you might want to take out the inside wall, remove the roof, or fold the walls down later. After you have made the changes, you can put the walls and roof back with Prestik.
Total [5]
How do you know when heat is escaping?
Look at the pictures below. The same pot full of hot food is shown on the left and on the right. On the left, somebody tries to pick up the pot and burns his hands. On the right, somebody puts a bag filled with straw around the pot, and then picks up the pot without burning his hands. You can say the hot pot on the right is insulated by the straw bag.
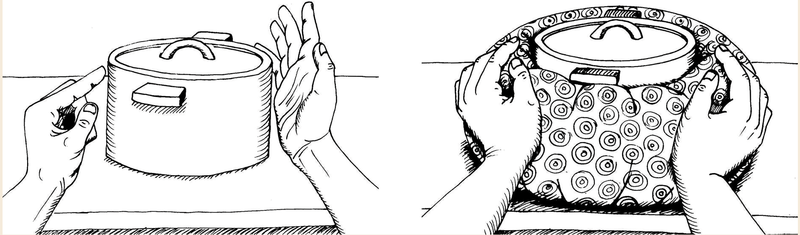
When you touch an object and feel that it is hot, it means that heat is escaping from the object. So the heat moves from the object to you. You are getting warmer and the object is getting cooler.
When you touch an object and it does not feel hot, it means that heat is not moving from the object to you.
You can feel the heat of the pot on the left, which means that heat is escaping from that pot. Therefore, the pot will cool down.
You cannot feel the heat of the pot on the right with the straw bag around it. That means heat is not escaping from that pot, or it is escaping very slowly. So the pot on the right will stay warmer for much longer than the pot on the left.
Team meeting on how to improve a house (30 minutes)
Design: how to improve a house to use less energy
Think of ideas to improve a house so that it will use less electricity and/or fuel. The questions below can help you. Working as a team will also help you, but you should still write down your own ideas. Your teacher will assess your ideas.
Try to think of changes to a house that will be cheap and easy to make.Maybe you can use recycled or natural materials, or even plants.
-
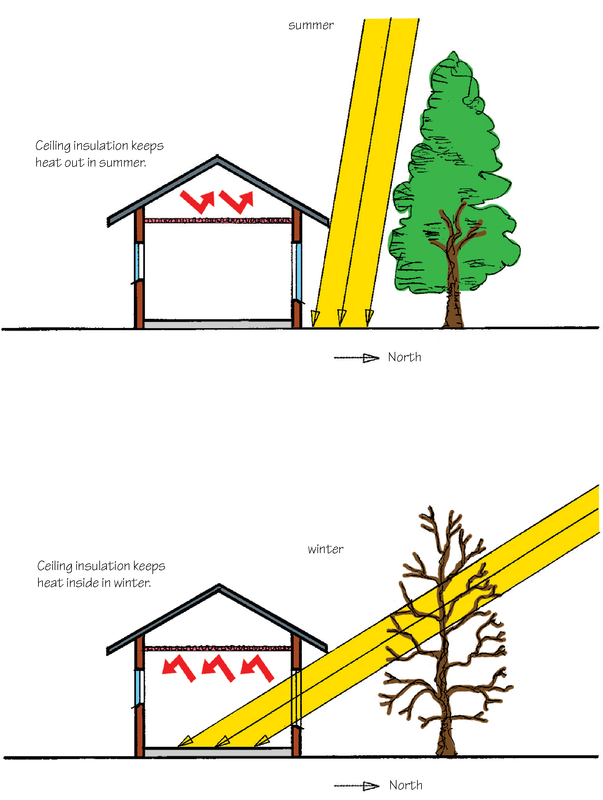
What can be changed about the roof design so that sunlight will not come through the windows in the middle of summer, but will come through the windows in winter? Make a rough sketch of your design.(2)

-
How can you prevent heat from escaping through the roof when it is cold outside? Make a rough sketch of your design.(2)
-
The owners of a house want to put in a small fireplace, like the one on the right, to heat the house in winter.
-
Where in the house should they put the fireplace and its chimney? Show the position of the fireplace on the floor plan below. A floor plan is what you see when the roof is off and you look at the house from the top.
Hint: You want as much of the heat from the fireplace to stay inside the house. You do not want heat to escape to the outside.(1)
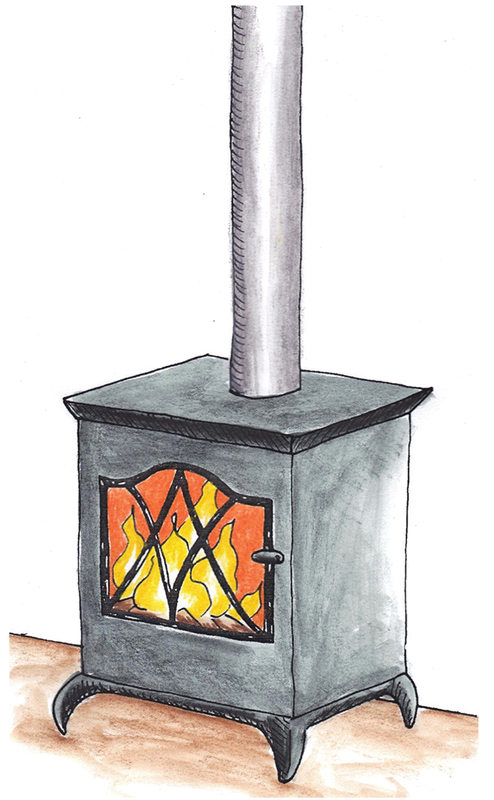
Figure 38 Hint: Read the part in the coloured box on page 168 about the insulated pot.
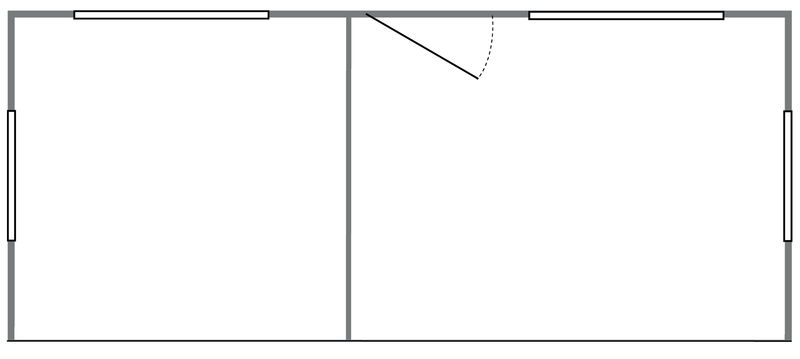
Figure 39: Floor plan of your model house -
Why would you put the fireplace there?(1)
-
Three different people cook soup on a gas stove in different ways, as shown below.
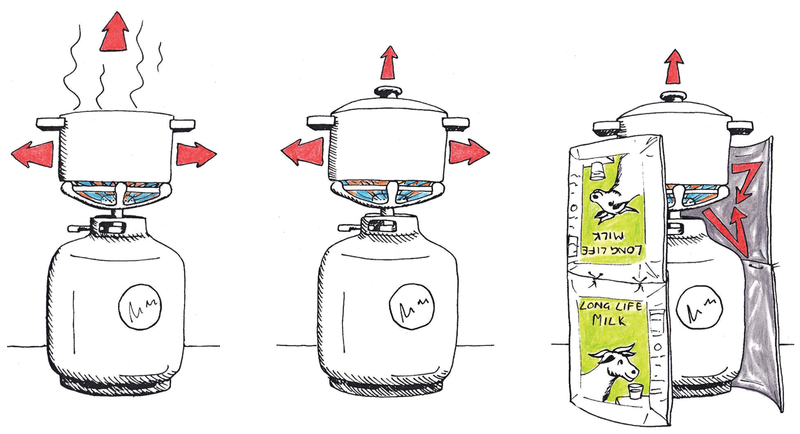
Figure 40 Who will use the least amount of gas to cook the soup? Explain your answer.(2)
-
Have another look at the previous two chapters. Do any of the pictures give you other ideas on how to improve a house to save energy?(2)
Total [10]
Drawing your planned improvements to the house (30 minutes)
Make: isometric projection drawing of your planned improvements
-
-
Make a freehand sketch in 3D to show what you plan to add or change to the outside of the house. Your sketch should show what you would see if you were sitting in a tree on the front, left side of the house. One of the photos in Figure 34 shows this view of the house.
Add labels and notes to your sketch to explain the improvements.
Your teacher will look at the following to give you marks:
- You have shown at least one improvement on the outside of the house. (1)
- The improvements will really reduce how much energy the house willuse, and it will be cheap and easy to make the improvements in real life. (2)
- It is easy for someone else to understand what you have sketched. (2)
- The labels and notes explain the improvements well. (2)
-
Make an isometric projection drawing to show your planned improvements to the outside of the house. Your drawing should again show what you would see if you were sitting in a tree on the front left side of the house.
Do not show any hidden details.
Your teacher will look at the following aspects of the drawing to give you marks:
- It has an appropriate heading. (1)
- It is made from the correct viewing point. (2)
- It shows all the improvements shown in your sketch. (1)
- It shows all the visible lines of the house. (1)
- It shows all vertical lines as vertical and all horizontal lines at 30°. (2)
- It is neat. (1)
Total marks [15]
Homework
-
Ask your grandparents or old people in your community for advice. Tell them:
"I want to learn how to make changes to a house so that it will use less electricity or fuel for heating in winter, and less electricity for cooling in summer. Please tell me more about changes that are cheap and easy to make."
Write down their advice below. You can also make sketches.
-
Gather materials that you can use to improve your model house, and bring it to school next week. Some waste materials will work well. You do not have to use the same materials on the model that you would use in real life. Also bring a piece of corrugated cardboard that is at least as big as an A4 sheet.
If you do not bring these materials, you will not be able to show the improvements on your model house.
Week 4
Make improvements to your model house (60 minutes)
Make: improve your model house
Individual work
You want to show other people the different improvements that can be made to the house, so that less energy will be needed to heat or cool the house. Some improvements may be on the outside of the house. Other improvements may be on the inside of the house. Some things may even be added on the ground around the house.
Stick your model of a house on a big flat piece of cardboard using Prestik. The flat piece of cardboard represents the ground around the house.
Now add or change things to the house so that it will use less energy. Use the materials you brought from home to make the changes.
For each thing that you add or change to the model, make a small paper sticker with a number on it, and stick it to the thing that you add or change. Write down the numbers of all the changes on a piece of paper. For each change, say what its purpose is and what it is made of. If you know the name of the thing, you can also write it down. For example:
-
What is it made of in real life?
What is its purpose?
What is its name?
This piece of paper is called a legend. It explains to people what the different things on your model are.
Total [20]
Evaluate your improvements to the house (60 minutes)
You will make an evaluation sheet to evaluate your own work, as well as the work of two other learners who are not on the same team as you.
Evaluate each model objectively and fairly. So you should pretend that you are evaluating the work of someone that you do not know. Do not give high marks to yourself or others if the improvements to the house are not good or not enough.Be prepared to explain why you gave a low, medium or high mark.
Evaluate: Make and use an evaluation sheet
-
Change each of the following criteria into a question. Then make a table with all the questions. You will give a mark next to each question, from one to three.
- There should be at least two improvements on the inside of the house. The more improvements there are, the better. But ignore changes to the model house that will not reduce the amount of energy used.
- There should be at least one improvement on the outside of the house. The more improvements there are, the better. Ignore changes that will not work.
- The improvements should be as cheap as possible, and easy to make in real life. They should not require a lot of extra building to be done.
- It will be good if some of the improvements are made with natural materials that can be found close by, or by re-using waste material.
- The improvements on the model should be neat. It should be easy to understand what the improvements are just by looking at the model.
-
The legend
should give a clear explanation of what the improvements
are.
Evaluation sheet for your own model
Evaluation sheet for the model of .....................................
Evaluation sheet for the model of .....................................
Week 5
Present your model of a low-energy house
Your team will give a presentation of your improvements to a house later this week. The presentation should be between three and five minutes long. Each member of your team should do a part of the presentation. The other learners in the class can ask you questions after your presentation.
Prepare your presentation (30 minutes)
Team meeting
-
Decide which part of the presentation each one of you will do.
- One of you should talk about the rough sketches, and the final isometric projection drawing you made.
- One of you should show a model and explain all the changes inside and outside the model.
- One of you should talk about the advice that old people gave you on how to improve a house to save energy. You should also talk about how natural materials can be used to improve a house.
- If there is a fourth person in your group, he or she should talk about the first plans you made during your team meeting in week three, and how you improved or added to those plans later on.
-
Decide in what order you will give the different parts of the presentation. Who will talk first, and who will talk next? Write the parts of the presentation in the order that you will do them below, and show who will do which part.
Individual work
-
Plan your own part of the presentation.Use the space below to write notes about what you will do.
-
Homework: Practise your presentation.
Hints for presenting your work
- Stand up straight and look at the class when you speak.
- Do not write out everything that you will say. Rather make a list of the main things you will talk about. This should not be more than five things. Your list should not have full sentences, but only key words to remind you of what you want to talk about.
- What you are telling the class is very important, because it can help people save money and reduce the negative impact on the environment. Be proud of what you tell the class and speak loudly and clearly.
- Use your sketches, drawings and model to point to things while you are talking. This will help the class to understand what you are saying. Make sure they can see the sketches, drawings and model clearly.
- You can also bring pictures from magazines or newspapers, or examples of materials, and use that in your presentation.
- Know when it is your turn to speak.
- Keep to the time limit. It often helps to ask somebody else in the class to hold up cards saying how much time you have left.
Presentations of all the teams to the class (90 minutes)
Listen well to the presentations of the other teams. They may have interesting ideas that you did not think of. Write those ideas down below, to help you to remember them when you design or improve your own house one day.
Enjoy your winter holiday! After the holiday, you will make things that work with levers and gears.


