Push and lift objects
In this chapter, you will learn about ways in which people manage to do things that they cannot do with their bodies alone.
Special projects
If you have time to spare in class or at home, give one or more of these activities a try:
-
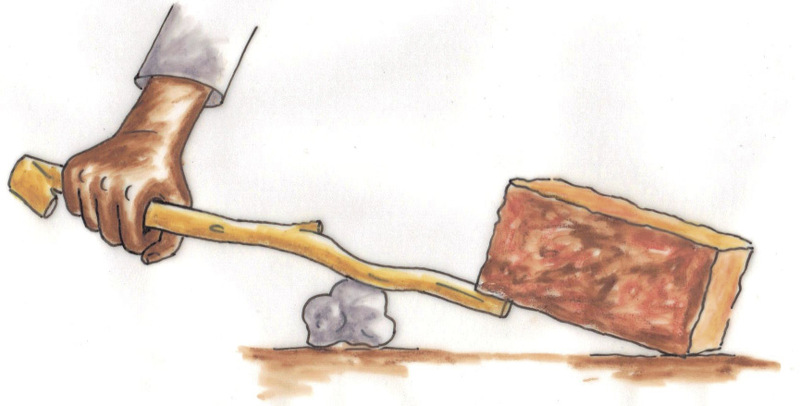
Build a working model of the water lever on the next page. If you can make it in the next two days, you can use it in lesson 4.3.
-
Look carefully at the coloured diagrams on the next page. Try to see what properties of levers can be seen in the diagrams. Write captions for the drawings that explain what they show.
Lift things with a lever
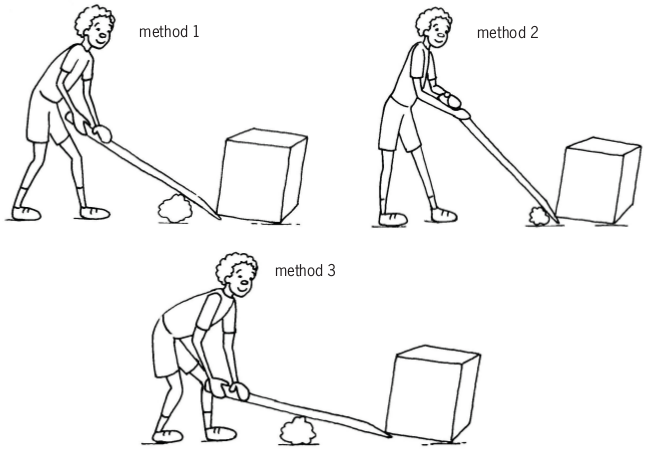
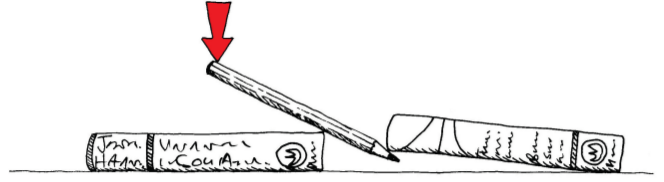
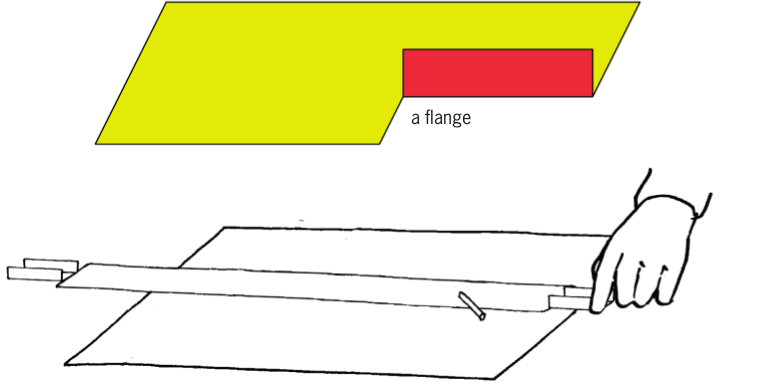
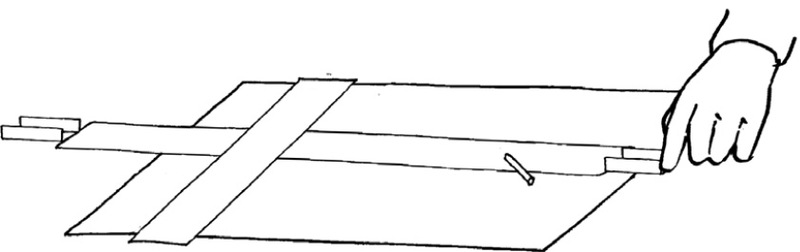
In the pictures below, Tom tries to lift one side of a block of concrete with a lever. The pictures show three different ways in which he can try to do so.
-
Which way do you think will work best, and why do you think so?
The lever rests on a small stone and will turn on the stone. When Tom pushes the one end of the lever down, the other end pushes the concrete block up.
-
Describe what is different about the lever in each of the
three cases.
Join two classmates and work with a lever
You need three things for this activity:
- a stick of about 30 cm long, that can be used as a lever,
- a brick or a stone about the size of a brick, and
- something on which the lever can be supported.
Now do the following:
Use the stick as a lever to lift one side of the brick.

Take turns to use the stick as a lever to lift the one end of the brick. Do it with different positions of the fulcrum, so that you can answer the question below.
-
When does the lever help you most? Is it when the fulcrum is close to the brick or when it is far from the brick?
If you did not do the above, do this:
Put your pencil against the edge of a book and try to lift the one side of another book up, as shown in the picture below.
Do this with the edge of the book on the left in different positions below the pencil.
-
In which position of the fulcrum does the pencil give you the greatest "advantage" for lifting the book?
In this case, the word advantage means that the lever makes it easier for you to lift the object.
Some words that may be new to you, or are used in a new way, are printed in quotation marks, for example "advantage". This is to tell you that you may not immediately understand the word, but you will learn what it means as you continue.
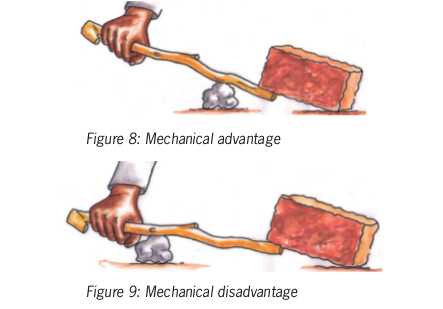
When something is too heavy to lift by hand, you can use a lever to help you lift it. If you want to lift a heavy object, you should use a long lever and the fulcrum should be close to the object that you want to lift. If you give a soft or weak downwards push on the one side of the lever, there will be a strong upwards push on the object on the other side of the lever.
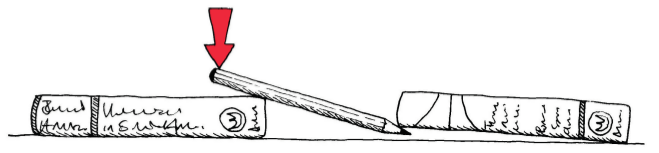
Scientists and technologists use the words "mechanical advantage" when referring to this. In the pictures below, the lever gives you a greater mechanical advantage when the fulcrum is closer to the brick.
-
Have another look at Figure 4 of this chapter. Which method gives Tom the biggest mechanical advantage when he uses the lever?
The downward push that Tom makes on the lever is called the input force or effort. The weight of the concrete block that tries to keep the other end of the lever down is called the load. The upward push on the load is called the output force or effect.

When you use a lever to lift an object, the push on the object may be stronger than, equal to or weaker than your input force.
-
Where is the input force, the load and the fulcrum on each of these pictures? Write your answers next to the pictures.
The output force may be smaller than the input force. In this case, technologists say the mechanical advantage is smaller than 1. This is actually a mechanical disadvantage.
The output force may be bigger than the input force.In that case, technologists say the mechanical advantage is greater than 1.
If the output force is equal to the input force, technologists say the mechanical advantage is 1.
Important: something you need to do at home
Bring a box or two pieces of cardboard that are at least as big as an A4 sheet of paper to your next Technology class. You will need this to make a cardboard lever and to do a few experiments.
It helps the environment if you pick up boxes or pieces of cardboard and other trash that lie around in the street, so pick these up and help to keep our streets clean!
Move things without touching them
A lever can turn around the fulcrum.
We also say the lever "pivots" around the fulcrum.
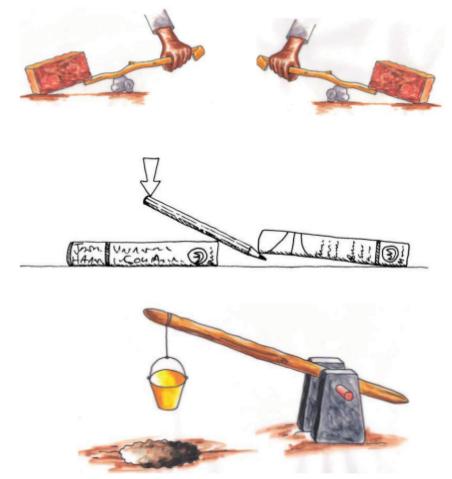
In the diagrams below, the fulcrum is in different positions.
In each case, state whether the mechanical advantage is bigger than 1, equal to 1 or smaller than 1.

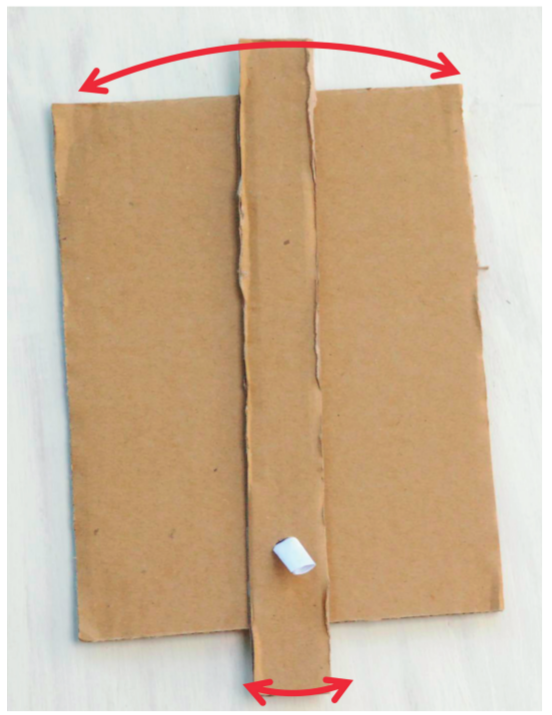
Make a lever with a base
In this activity, you will make a lever that you can use to do a few experiments. Doing the experiments will help you to understand levers better.
-
Mark the fulcrum of the lever in the photograph.
Instead of fulcrum we can say pivot point. It means the same.
If you make your lever from cardboard, you will need the tools and materials below.
Tools: Materials: - a pair of scissors,
- a sharp pencil or a nail.
- a strip of corrugated cardboard about 30 cm long,
- a piece of corrugated cardboard about as big as an A4 sheet of paper,
- a sheet of used paper,
- a piece of sticky tape, and
- a small box or bag with sand or stones inside.
-
Before you start, look carefully at the photo on the previous page. Make sure you understand how your lever will work.
Use a strip of corrugated cardboard about 30 cm long and 3 cm wide for the lever. Mark a position for a hole about 4 cm from the one end, in the middle of the width of the cardboard.
You may have construction kits or perforated Masonite available. Use it instead of cardboard for this work. Be careful though and do not limit your opportunities to acquire basic skills by using "easy" materials.

Figure 15 -
Use a sharp pencil to make a hole at the mark.
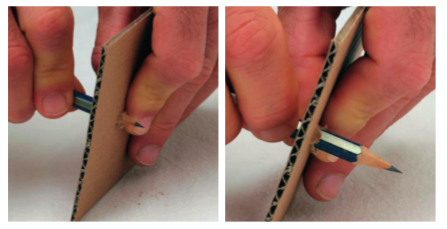
Figure 16 Safety precaution:
Make sure you do not push the pencil into your finger.
-
Make a hole in the sheet of corrugated cardboard, about 8 cm from one end, as shown in the diagram.
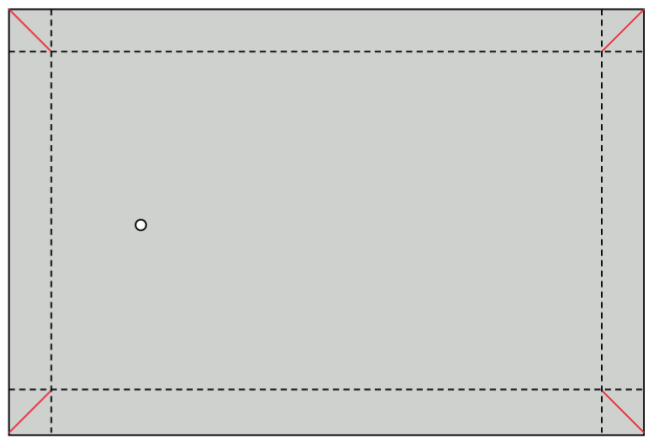
Figure 17 This will be the base to which you will attach your lever.
-
You can use a "paper dowel" to attach the lever to the base. It can act as a pivot around which the lever can swing. To make a paper dowel, tightly roll paper around your pencil as shown below.
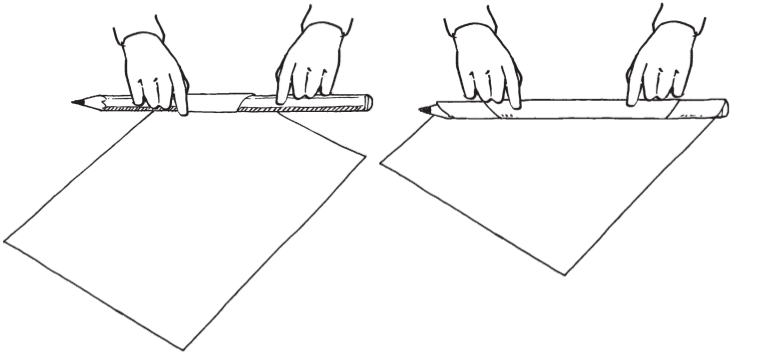
Figure 18 Once you think it is strong enough, cut off the remaining paper.
The holes that you punched into the cardboard strip and sheet will be rough on the one side and smooth on the other.
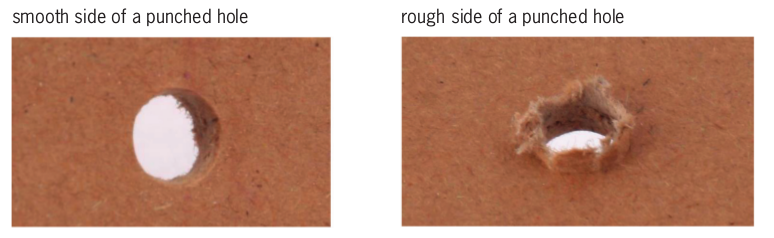
Figure 19 -
Put the strip on top of the sheet so that the smooth sides of the holes are between the strip and the sheet. Put your paper dowel through the holes so that it connects the strip with the sheet.
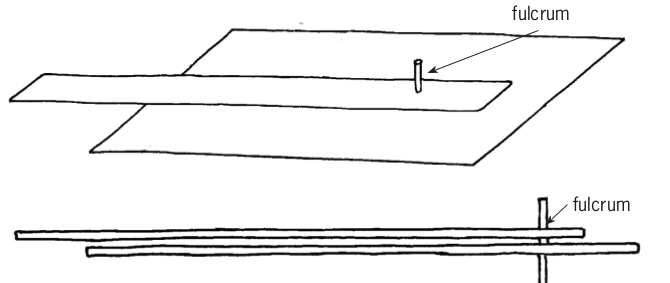
Figure 20 -
Fold the paper dowel over on both sides. Tape it down at the bottom of the support sheet.
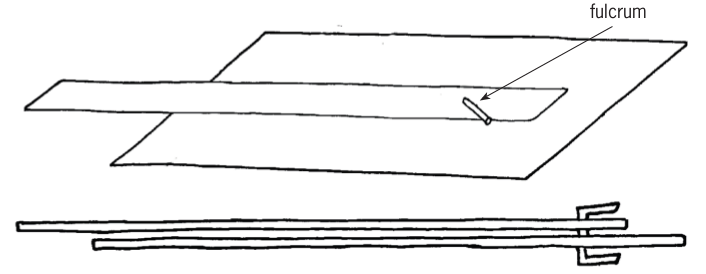
Figure 21 Try to use your lever to move the small bag of sand around on your desk.
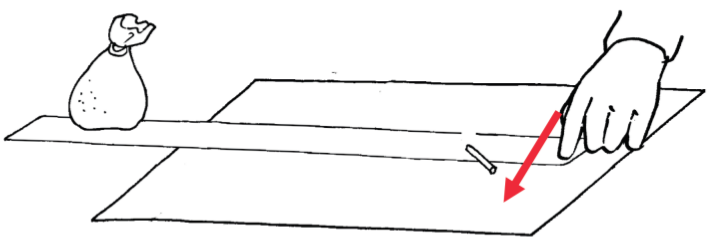
Figure 22 -
It may not work very well. Think a bit, and then describe how you can improve your lever so that it will work better when you want to move the bag around.
Here are two improvements that you can make to your lever:
- You can make cuts and fold the card up to form flanges on both sides at each end of the lever. The sketch below shows a piece of paper that is yellow on top and red at the bottom. One cut was made and part of the paper was then folded up to make a flange.
- You can add a paper strip that prevents the lever from lifting up.
Evaluation and improvement
Technologists evaluate their work all the time. When they see that something will not work well, they change it to make it work better. When you do your mini-PAT later this term, you will design a device that works with two levers. You will make a working model of your design. When you do that, you should also evaluate your design all the time. Look for opportunities to improve your design and your working model.
You can improve your lever on a base by adding "spacers" to keep the lever some distance from the base.
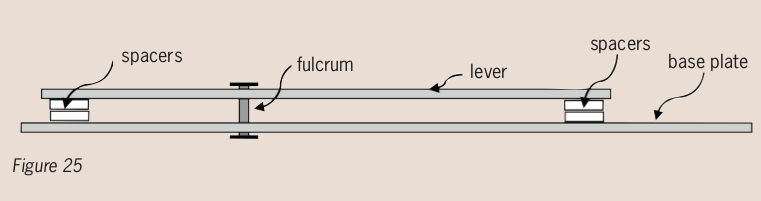
You can cut the spacers from the same cardboard that you used for the lever.
You can glue them to each other and to the lever. It may even be better if you add spacers at the fulcrum too. You will have to cut holes in your spacers, so that the peg or dowel can pass through the holes.
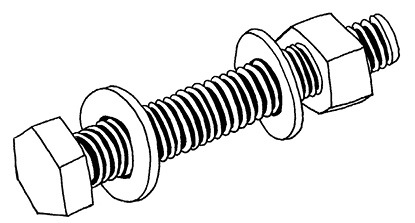
Round spacers with holes in the middle are called washers. Washers are often used when things are tied together with bolts and nuts.
Do different things with levers
Change direction of movement
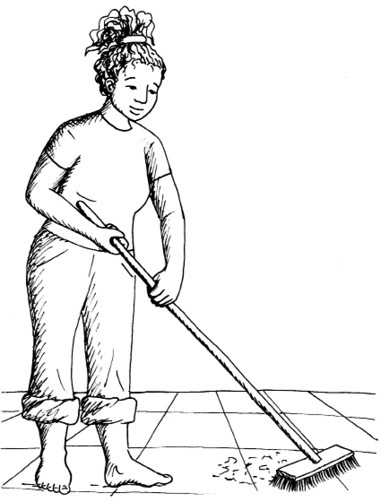
Levers can be used for reasons other than to gain a mechanical advantage. When you sweep the floor with a broom that has a long handle you use the broom as a lever. The long handle makes it possible to sweep over a large area while moving your hands only for a short distance. In this case the lever (the broomstick) gives you a distance advantage, although there is no mechanical disadvantage.
Levers also change the direction of movement. If you push the one end of the blue lever below down, the other end moves up.
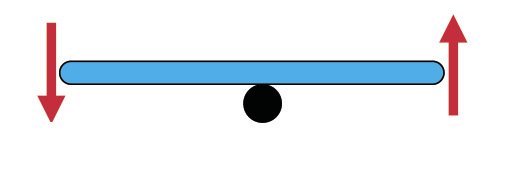
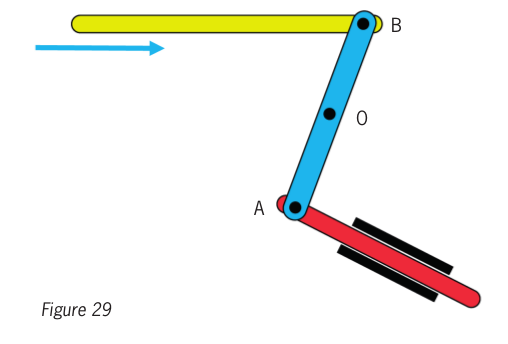
In the above case, the output movement is in the opposite direction than the input movement. Linkages and guides can be used, as shown in the diagram below, to control the change of direction of movement caused by a lever.
The blue bar on this diagram indicates a lever that pivots around point O. The yellow bar is a rod that can be used to push end A of the lever. The red bar can only move between the two black strips. The black dots at A and B indicate linkages (for example dowels that fit loosely in holes), around which the yellow, blue and red rods can pivot.
If the yellow rod is pushed in the direction of the blue arrow, in what direction will the red rod move? Make an arrow on the diagram to show the direction.
If you wish, you may build a system like this from cardboard.
Evaluate a design
Simon wants to build a device that will help him to lift heavy objects. His idea is to drive one lever with another lever, so that he can have a big mechanical advantage. He made this drawing of his design.
Do you think Simon's design will work?
Write down why you think it will work, or why you think it will not work.
Also suggest how he can improve his design.
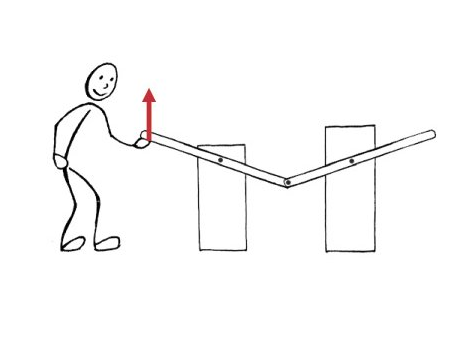
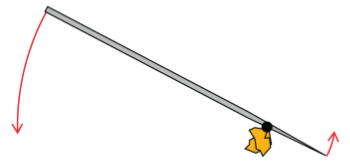
Redesign a water lever
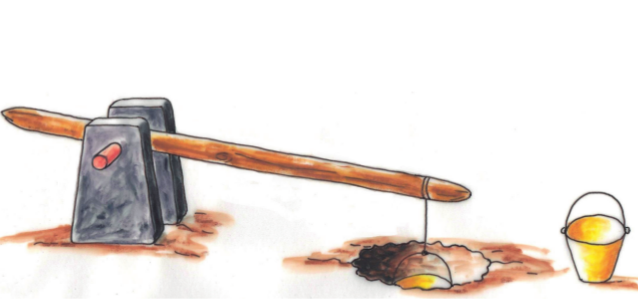
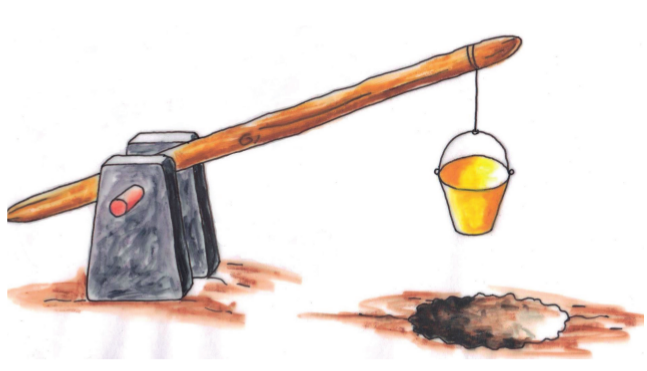
Have another look at Figure 3 on page 46. It shows a big lever that lifts buckets of water out of a well.
Strong, young people can easily push the lever down at the short end to lift a bucket of water out of a well. But older and sick people, who are not so strong, find it very difficult to do this.
How can this lever be redesigned so that it becomes easier to lift a bucket of water?
Next week
In the next chapter, you will learn more about effort and load, and how the fulcrum can be changed around to make other types of levers. You will also learn more about other types of levers.


